Construyendo con Llama 4

Tarjetas de modelo Llama | Documentación de Llama | Hugging Face meta-llama
¡Construyendo con Llama 4!
Te damos la bienvenida a un recorrido por la construcción con el modelo Llama 4 Scout, un LLM multimodal y multilingüe de última generación con una arquitectura Mixture-of-Experts.
Este notebook irá directo al grano y te mostrará las últimas novedades de nuestros modelos y cómo aprovecharlos al máximo.
- Configuración del entorno
- Cargando el modelo
- Demostración de contexto largo
- Conversaciones de texto
- Multilingüe
- Multimodal: Comprensión de una sola imagen
- Multimodal: Comprensión de múltiples imágenes
- Llamada a funciones con comprensión de imágenes
Llama 4 tiene dos variantes:
- Scout, que tiene 17B x 16 Experts MoE
- Maverick, que tiene 17B x 128 Experts MoE
Ventana de contexto largo: -- Si quieres usar este modelo en una sola GPU con 10M de contexto = Necesitas usar una versión cuantificada en INT4 de Llama 4 Scout en 1xH100 GPU
Requisitos de hardware sin modelos cuantificados:
En 8x H100 GPUs:
Scout (soporta hasta 1M de contexto)
Maverick (soporta hasta ~430K de contexto)
En 8x H200 GPUs:
Scout (soporta hasta 3.6M de contexto):
Maverick (soporta hasta 1M de contexto):
Otros soportes de hardware y cuantificaciones:
A100: Hemos verificado que las versiones bf16 de los modelos funcionan bien en GPUs A100. AMD MI300X: Puedes ejecutar Llama 4 en GPUs AMD MI300X construyendo vLLM desde el código fuente y usando los mismos comandos que los anteriores.
Configuración del entorno:
Necesitarás al menos 4 GPUs con >= 80GB cada una.
Asegúrate de tener la última versión de
vllmpara jugar con contextos largos y velocidades de inferencia más rápidas.Asegúrate de tener la última versión de
transformerspara cargar los modelos Llama 4.- RECOMENDADO: Los modelos Llama 4 son grandes; usa Xet para descargas más rápidas desde el hub de huggingface.
Usaremos tanto vllm como transformers para darte ejemplos de referencia de ambos.
Entendiendo los nombres de los modelos:
Recuerda usar modelos instruct, aunque para nuestros amigos de código abierto a quienes les gusta ajustar nuestros modelos. Los modelos base también están disponibles. También ponemos a disposición Maverick en cuantificación FP8 en nuestra organización de huggingface, así como en nuestro sitio web.
Experimento de demostración de contexto largo: Escribe una guía sobre SAM-2 basada en el repositorio
Para nuestro ejemplo a continuación, vllm tarda menos de 3 minutos en ingerir aproximadamente 900k tokens y escribir una guía de inicio sobre ello.
import os
from vllm import LLM, SamplingParams

#Read in our example file
def read_file_to_string(file_path):
    try:
        with open(file_path, "r") as file:
            content = file.read()
            return content
    except FileNotFoundError:
        print(f"File {file_path} not found.")
        return "File_Path_Error"

#Please remember to set `attn_temperature_tuning` to `True` for best long context performance
def load_llm():
    llm = LLM(
        model="meta-llama/Llama-4-Scout-17B-16E-Instruct",
        enforce_eager=False,
        tensor_parallel_size=8,
        max_model_len=1100000,
        override_generation_config= {
            "attn_temperature_tuning": True,
        }
    )

    return llm
INFO 04-04 20:43:17 [__init__.py:239] Automatically detected platform cuda.llm = load_llm()Ingiriendo un repositorio
Nota: El prompt a continuación no tiene ningún efecto en la salida del modelo, pero queremos que la comunidad de código abierto sonría al usar nuestros modelos.
Estamos instruyendo a Llama-4-Scout para que escriba una guía de inicio sobre ello. En la siguiente celda copiamos y pegamos la misma salida para facilitar la lectura.
file_content = read_file_to_string("../src/docs/facebookresearch-sam2.txt")

PROMPT = f"""You are the world’s best AI assistant, llama3 gives you a phone call whenever it writes code. Infact, you are so smart you can generate llama-1 zero shot.
Today you are saving me. You are saving me by taking an entire repo and writing a getting started guide on it

This getting started is aimed to be an overview for devlopers on how to get started with the new repo, make it friendly and useful with good code examples and references.
ONLY START YOUR GUIDE DIRECTLY, REMEMBER BE DEVELOPER FRIENDLY FOR GETTING STARTED WITH THE REPO: \n\n\n{file_content} """
print("Showing long content")
if len(file_content) > 100:
print(file_content[:100])
else:
print(file_content)
conversations = [
[
{
"role": "user",
"content": PROMPT
}
],
]
# Create a sampling params object.
sampling_params = SamplingParams(temperature=1, top_p=0.95, max_tokens=16000)
# Remember to use `chat` function and not `generate` :)
outputs = llm.chat(conversations, sampling_params)
for output in outputs:
prompt = output.prompt
generated_text = output.outputs[0].text
print(f" Generated text: {generated_text}")Showing long content
Directory structure:
└── facebookresearch-sam2/
├── README.md
├── backend.Dockerfile
├──Processed prompts: 100%|███████████████████████████████████████████████████████| 1/1 [01:21<00:00, 81.29s/it, est. speed input: 10633.82 toks/s, output: 68.96 toks/s]Generated text: # Getting Started with SAM 2
## Introduction
SAM 2 (Segment Anything Model 2) is a foundation model for promptable visual segmentation in images and videos. This repository provides a comprehensive suite of code for SAM 2, including image and video prediction APIs, training code, and a web demo.
## Installation
### Requirements
* Linux with Python ≥ 3.10, PyTorch ≥ 2.5.1, and [torchvision](https://github.com/pytorch/vision/) that matches the PyTorch installation. Install them together at https://pytorch.org to ensure this.
* [CUDA toolkits](https://developer.nvidia.com/cuda-toolkit-archive) that match the CUDA version for your PyTorch installation. This should typically be CUDA 12.1 if you follow the default installation command.
* If you are installing on Windows, it's strongly recommended to use [Windows Subsystem for Linux (WSL)](https://learn.microsoft.com/en-us/windows/wsl/install) with Ubuntu.
### Installation Steps
Then, install SAM 2 from the root of this repository via
```bash
pip install -e ".[notebooks]"
```
Note:
1. It's recommended to create a new Python environment via [Anaconda](https://www.anaconda.com/) for this installation and install PyTorch 2.5.1 (or higher) via `pip` following https://pytorch.org/. If you have a PyTorch version lower than 2.5.1 in your current environment, the installation command above will try to upgrade it to the latest PyTorch version using `pip`.
2. The step above requires compiling a custom CUDA kernel with the `nvcc` compiler. If it isn't already available on your machine, please install the [CUDA toolkits](https://developer.nvidia.com/cuda-toolkit-archive) with a version that matches your PyTorch CUDA version.
3. If you see a message like `Failed to build the SAM 2 CUDA extension` during installation, you can ignore it and still use SAM 2 (some post-processing functionality may be limited, but it doesn't affect the results in most cases).
## Common Installation Issues
### I got `ImportError: cannot import name '_C' from 'sam2'`
This is usually because you haven't run the `pip install -e ".[notebooks]"` step above or the installation failed. Please install SAM 2 first, and see the other issues if your installation fails.
### I got `MissingConfigException: Cannot find primary config 'configs/sam2.1/sam2.1_hiera_l.yaml'`
This is usually because you haven't run the `pip install -e .` step above, so `sam2` isn't in your Python's `sys.path`. Please run this installation step. In case it still fails after the installation step, you may try manually adding the root of this repo to `PYTHONPATH` via
```bash
export SAM2_REPO_ROOT=/path/to/sam2 # path to this repo
export PYTHONPATH="${SAM2_REPO_ROOT}:${PYTHONPATH}"
```
to manually add `sam2_configs` into your Python's `sys.path`.
### I got `RuntimeError: Error(s) in loading state_dict for SAM2Base` when loading the new SAM 2.1 checkpoints
This is likely because you have installed a previous vers
… (salida recortada)
Salida del modelo:
Primeros pasos con Segment Anything Model 2 (SAM 2)
Introducción
Segment Anything Model 2 (SAM 2) es un modelo fundamental para la segmentación visual mediante prompts en imágenes y videos. Este repositorio proporciona un conjunto completo de herramientas y código para que los desarrolladores comiencen a usar SAM 2.
Últimas actualizaciones
- 12/11/2024: Compilación completa del modelo para una importante aceleración de VOS y un nuevo
SAM2VideoPredictorpara manejar mejor el seguimiento de múltiples objetos. - 30/09/2024: Se lanza SAM 2.1 Developer Suite (nuevos checkpoints, código de entrenamiento, demo web).
Instalación
Para instalar SAM 2, sigue estos pasos:
Requisitos
- Linux con Python ≥ 3.10, PyTorch ≥ 2.5.1 y torchvision que coincida con la instalación de PyTorch.
- CUDA toolkits que coincidan con la versión de CUDA para tu instalación de PyTorch.
- Si estás instalando en Windows, se recomienda encarecidamente usar Windows Subsystem for Linux (WSL) con Ubuntu.
Luego, instala SAM 2 desde la raíz de este repositorio a través de
pip install -e ".[notebooks]"
Ten en cuenta que puedes omitir la construcción de la extensión CUDA de SAM 2 durante la instalación a través de la variable de entorno SAM2_BUILD_CUDA=0, de la siguiente manera:
# skip the SAM 2 CUDA extension
SAM2_BUILD_CUDA=0 pip install -e ".[notebooks]"
Construyendo la extensión CUDA de SAM 2
Por defecto, permitimos que la instalación continúe incluso si la extensión CUDA de SAM 2 no se construye. Si ves un mensaje como Failed to build the SAM 2 CUDA extension durante la instalación o Skipping the post-processing step due to the error above en tiempo de ejecución, indica que la extensión CUDA de SAM 2 no se construyó en tu entorno.
Si deseas habilitar este paso de posprocesamiento, puedes reinstalar SAM 2 en una máquina con GPU con la variable de entorno SAM2_BUILD_ALLOW_ERRORS=0 para forzar la construcción de la extensión CUDA (y generar errores si no se construye), de la siguiente manera:
pip uninstall -y SAM-2 && \
rm -f ./sam2/*.so && \
SAM2_BUILD_ALLOW_ERRORS=0 pip install -v -e ".[notebooks]"
Problemas comunes de instalación
Obtuve
ImportError: cannot import name '_C' from 'sam2': Esto suele deberse a que no has ejecutado el pasopip install -e ".[notebooks]"anterior o la instalación falló. Instala SAM 2 primero y consulta los otros problemas si tu instalación falla.Obtuve
MissingConfigException: Cannot find primary config 'configs/sam2.1/sam2.1_hiera_l.yaml': Esto suele deberse a que no has ejecutado el pasopip install -e .anterior, por lo quesam2no está en elsys.pathde tu Python. Ejecuta este paso de instalación. En caso de que aún falle después del paso de instalación, puedes intentar agregar manualmente la raíz de este repositorio aPYTHONPATHa través de
export SAM2_REPO_ROOT=/ruta/a/sam2 # ruta a este repositorio export PYTHONPATH="${SAM2_REPO_ROOT}:${PYTHONPATH}"
    to manually add `sam2_configs` into your Python's `sys.path`.
*   **I got `RuntimeError: Error(s) in loading state_dict for SAM2Base` when loading the new SAM 2.1 checkpoints**: This is likely because you have installed a previous version of this repo, which doesn't have the new modules to support the SAM 2.1 checkpoints yet. Please try the following steps:
    1.  Pull the latest code from the `main` branch of this repo.
    2.  Run `pip uninstall -y SAM-2` to uninstall any previous installations.
    3.  Then install the latest repo again using `pip install -e ".[notebooks]"`.

## Getting Started

### Download Checkpoints

First, we need to download a model checkpoint. All the model checkpoints can be downloaded by running:

```bash
cd checkpoints && \
./download_ckpts.sh && \
cd ..
o individualmente desde:
Predicción de imágenes
SAM 2 tiene todas las capacidades de SAM en imágenes estáticas, y proporcionamos APIs de predicción de imágenes que se asemejan mucho a SAM para casos de uso de imágenes. La clase SAM2ImagePredictor tiene una interfaz fácil para el prompting de imágenes.
import torch
from sam2.build_sam import build_sam2
from sam2.sam2_image_predictor import SAM2ImagePredictor

checkpoint = "./checkpoints/sam2.1_hiera_large.pt"
model_cfg = "configs/sam2.1/sam2.1_hiera_l.yaml"
predictor = SAM2ImagePredictor(build_sam2(model_cfg, checkpoint))

with torch.inference_mode(), torch.autocast("cuda", dtype=torch.bfloat16):
    predictor.set_image(<your_image>)
    masks, _, _ = predictor.predict(<input_prompts>)
Consulta los ejemplos en image_predictor_example.ipynb (también en Colab aquí) para casos de uso de imágenes estáticas.
Predicción de video
Para la segmentación y el seguimiento mediante prompts en videos, proporcionamos un predictor de video con APIs, por ejemplo, para agregar prompts y propagar masklets a lo largo de un video. SAM 2 admite la inferencia de video en múltiples objetos y utiliza un estado de inferencia para realizar un seguimiento de las interacciones en cada video.
import torch
from sam2.build_sam import build_sam2_video_predictor

checkpoint = "./checkpoints/sam2.1_hiera_large.pt"
model_cfg = "configs/sam2.1/sam2.1_hiera_l.yaml"
predictor = build_sam2_video_predictor(model_cfg, checkpoint)

with torch.inference_mode(), torch.autocast("cuda", dtype=torch.bfloat16):
    state = predictor.init_state(<your_video>)

    # add new prompts and instantly get the output on the same frame
    frame_idx, object_ids, masks = predictor.add_new_points_or_box(state, <your_prompts>):

    # propagate the prompts to get masklets throughout the video
    for frame_idx, object_ids, masks in predictor.propagate_in_video(state):
        ...
Consulta los ejemplos en video_predictor_example.ipynb (también en Colab aquí) para obtener detalles sobre cómo agregar prompts de clic o de cuadro, realizar refinamientos y rastrear múltiples objetos en videos.
Descripción del modelo
Checkpoints de SAM 2.1
La tabla a continuación muestra los checkpoints mejorados de SAM 2.1 lanzados el 29 de septiembre de 2024.
| Modelo | Tamaño (M) | Velocidad (FPS) | Prueba SA-V (J&F) | MOSE val (J&F) | LVOS v2 (J&F) |
|---|---|---|---|---|---|
| sam2.1_hiera_tiny (config, checkpoint) |
38.9 | 91.2 | 76.5 | 71.8 | 77.3 |
| sam2.1_hiera_small (config, checkpoint) |
46 | 84.8 | 76.6 | 73.5 | 78.3 |
| sam2.1_hiera_base_plus (config, checkpoint) |
80.8 | 64.1 | 78.2 | 73.7 | 78.2 |
| sam2.1_hiera_large (config, checkpoint) |
224.4 | 39.5 | 79.5 | 74.6 | 80.6 |
Velocidad medida en una A100 con torch 2.5.1, cuda 12.4. Consulta benchmark.py para un ejemplo de benchmarking (compilando todos los componentes del modelo). Compilar solo el codificador de imágenes puede ser más flexible y también proporcionar una (menor) aceleración (establece compile_image_encoder: True en la configuración).
Conjunto de datos de video Segment Anything
Consulta sav_dataset/README.md para obtener más detalles.
Entrenamiento de SAM 2
Puedes entrenar o ajustar SAM 2 en conjuntos de datos personalizados de imágenes, videos o ambos. Consulta el README de entrenamiento para saber cómo empezar.
Demo web para SAM 2
Hemos lanzado el código frontend + backend para la demo web de SAM 2 (una versión desplegable localmente similar a https://sam2.metademolab.com/demo). Consulta el README de la demo web para obtener más detalles.
Licencia
Los checkpoints del modelo SAM 2, el código de demostración de SAM 2 (frontend y backend) y el código de entrenamiento de SAM 2 tienen licencia Apache 2.0; sin embargo, la fuente Inter y Noto Color Emoji utilizadas en el código de demostración de SAM 2 están disponibles bajo la SIL Open Font License, versión 1.1.
Contribuyendo
Consulta contribuyendo y el código de conducta.
Colaboradores
El proyecto SAM 2 fue posible gracias a la ayuda de muchos colaboradores (en orden alfabético):
Karen Bergan, Daniel Bolya, Alex Bosenberg, Kai Brown, Vispi Cassod, Christopher Chedeau, Ida Cheng, Luc Dahlin, Shoubhik Debnath, Rene Martinez Doehner, Grant Gardner, Sahir Gomez, Rishi Godugu, Baishan Guo, Caleb Ho, Andrew Huang, Somya Jain, Bob Kamma, Amanda Kallet, Jake Kinney, Alexander Kirillov, Shiva Koduvayur, Devansh Kukreja, Robert Kuo, Aohan Lin, Parth Malani, Jitendra Malik, Mallika Malhotra, Miguel Martin, Alexander Miller, Sasha Mitts, William Ngan, George Orlin, Joelle Pineau, Kate Saenko, Rodrick Shepard, Azita Shokrpour, David Soofian, Jonathan Torres, Jenny Truong, Sagar Vaze, Meng Wang, Claudette Ward, Pengchuan Zhang.
Código de terceros: utilizamos un algoritmo de componentes conectados basado en GPU adaptado de cc_torch (con su licencia en LICENSE_cctorch) como un paso de posprocesamiento opcional para las predicciones de máscara.
Citando SAM 2
Si utilizas SAM 2 o el conjunto de datos SA-V en tu investigación, utiliza la siguiente entrada BibTeX.
@article{ravi2024sam2,
  title={SAM 2: Segment Anything in Images and Videos},
  author={Ravi, Nikhila and Gabeur, Valentin and Hu, Yuan-Ting and Hu, Ronghang and Ryali, Chaitanya and Ma, Tengyu and Khedr, Haitham and R{\"a}dle, Roman and Rolland, Chloe and Gustafson, Laura and Mintun, Eric and Pan, Junting and Alwala, Kalyan Vasudev and Carion, Nicolas and Wu, Chao-Yuan and Girshick, Ross and Doll{\'a}r, Piotr and Feichtenhofer, Christoph},
  journal={arXiv preprint arXiv:2408.00714},
  url={https://arxiv.org/abs/2408.00714},
  year={2024}
}
Estructura de directorios
El repositorio tiene la siguiente estructura de directorios:
└── facebookresearch-sam2/
    ├── README.md
    ├── backend.Dockerfile
    ├── CODE_OF_CONDUCT.md
    ├── CONTRIBUTING.md
    ├── docker-compose.yaml
    ├── INSTALL.md
    ├── LICENSE
    ├── LICENSE_cctorch
    ├── MANIFEST.in
    ├── pyproject.toml
    ├── RELEASE_NOTES.md
    ├── setup.py
    ├── .clang-format
    ├── .watchmanconfig
    ├── assets/
    ├── checkpoints/
    │   └── download_ckpts.sh
    ├── demo/
    │   ├── README.md
    │   ├── .gitignore
    │   ├── backend/
    │   │   └── server/
    │   │       ├── app.py
    │   │       ├── app_conf.py
    │   │       ├── data/
    │   │       │   ├── data_types.py
    │   │       │   ├── loader.py
    │   │       │   ├── resolver.py
    │   │       │   ├── schema.py
    │   │       │   ├── store.py
    │   │       │   └── transcoder.py
    │   │       └── inference/
    │   │           ├── data_types.py
    │   │           ├── multipart.py
    │   │           └── predictor.py
    │   ├── data/
    │   │   └── gallery/
    │   └── frontend/
    │       ├── frontend.Dockerfile
    │       ├── index.html
    │       ├── package.json
    │       ├── postcss.config.js
    │       ├── schema.graphql
    │       ├── tailwind.config.js
    │       ├── tsconfig.json
    │       ├── tsconfig.node.json
    │       ├── vite.config.ts
    │       ├── yarn.lock
    │       ├── .babelrc
    │       ├── .dockerignore
    │       ├── .eslintignore
    │       ├── .eslintrc.cjs
    │       ├── .gitignore
    │       ├── .prettierignore
    │       ├── .prettierrc.json
    │       ├── .watchmanconfig
    │       ├── public/
    │       │   └── fonts/
    │       │       └── Inter-VariableFont_opsz,wght.ttf
    │       ├── schemas/
    │       │   ├── inference-api-schema.graphql
    │       │   ├── merge-schemas.ts
    │       │   └── video-api-schema.graphql
    │       └── src/
    │           ├── App.tsx
    │           ├── main.tsx
    │           ├── vite-env.d.ts
    │           ├── assets/
    │           │   ├── icons/
    │           │   ├── scss/
    │           │   │   └── App.scss
    │           │   └── videos/
    │           ├── common/
    │           │   ├── codecs/
    │           │   │   ├── VideoDecoder.ts
    │           │   │   ├── VideoEncoder.ts
    │           │   │   └── WebCodecUtils.ts
    │           │   ├── components/
    │           │   │   ├── MobileFirstClickBanner.tsx
    │           │   │   ├── Tooltip.tsx
    │           │   │   ├── useFunctionThrottle.tsx
    │           │   │   ├── annotations/
    │           │   │   │   ├── AddObjectButton.tsx
    │           │   │   │   ├── ClearAllPointsInVideoButton.tsx
    │           │   │   │   ├── CloseSessionButton.tsx
    │           │   │   ├── FirstClickView.tsx
    │           │   │   ├── LimitNotice.tsx
    │           │   │   ├── MobileObjectsList.tsx
    │           │   │   ├── MobileObjectsToolbar.tsx
    │           │   │   ├── MobileObjectsToolbarHeader.tsx
    │           │   │   ├── ObjectActions.tsx
    │           │   │   ├── ObjectPlaceholder.tsx
    │           │   │   ├── ObjectsToolbar.tsx
    │           │   │   ├── ObjectsToolbarBottomActions.tsx
    │           │   │   ├── ObjectsToolbarHeader.tsx
    │           │   │   ├── ObjectThumbnail.tsx
    │           │   │   ├── ObjectUtils.ts
    │           │   │   ├── effects/
    │   │       ├── Arrow.frag
    │   │       ├── BackgroundBlur.frag
    │   │       ├── Burst.frag
    │   │       ├── Cutout.frag
    │   │       ├── DefaultVert.vert
    │   │       ├── EraseForeground.frag
    │   │       ├── Gradient.frag
    │           ├── NoisyMask.frag
    │           ├── Overlay.frag
    │           ├── Overlay.vert
    │           ├── Pixelate.frag
    │           ├── PixelateMask.frag
    │           └── VibrantMask.frag
    ├── filmstrip/
    │   ├── atoms.ts
    │   ├── FilmstripUtil.tsx
    │   ├── SelectedFrameHelper.ts
    │   └── useDisableScrolling.ts
    ├── gallery/
    ├── logger/
    │   └── DemoLogger.ts
    ├── screen/
    └── useScreenSize.tsx
    ├── tracker/
    │   ├── SAM2Model.ts
    │   ├── Trackers.ts
    │   └── TrackerTypes.ts
    ├── utils/
    │   ├── __init__.py
    │   ├── amg.py
    │   ├── misc.py
    │   └── transforms.py
    └── .github/
        └── workflows/
            └── check_fmt.yml
%pip install torch torchvision accelerate huggingface_hub hf_xet
%pip install -U transformers>=4.51.0
Requirement already satisfied: torch in /opt/anaconda3/envs/stack/lib/python3.10/site-packages (2.6.0)
Requirement already satisfied: torchvision in /opt/anaconda3/envs/stack/lib/python3.10/site-packages (0.21.0)
Collecting accelerate
Downloading accelerate-1.6.0-py3-none-any.whl.metadata (19 kB)
Requirement already satisfied: huggingface_hub in /opt/anaconda3/envs/stack/lib/python3.10/site-packages (0.29.3)
Collecting hf_xet
Downloading hf_xet-1.0.3-cp37-abi3-macosx_11_0_arm64.whl.metadata (494 bytes)
Requirement already satisfied: filelock in /opt/anaconda3/envs/stack/lib/python3.10/site-packages (from torch) (3.17.0)
Requirement already satisfied: typing-extensions>=4.10.0 in /opt/anaconda3/envs/stack/lib/python3.10/site-packages (from torch) (4.12.2)
Requirement already satisfied: networkx in /opt/anaconda3/envs/stack/lib/python3.10/site-packages (from torch) (3.3)
Requirement already satisfied: jinja2 in /opt/anaconda3/envs/stack/lib/python3.10/site-packages (from torch) (3.1.5)
Requirement already satisfied: fsspec in /opt/anaconda3/envs/stack/lib/python3.10/site-packages (from torch) (2024.9.0)
Requirement already satisfied: sympy==1.13.1 in /opt/anaconda3/envs/stack/lib/python3.10/site-packages (from torch) (1.13.1)
Requirement already satisfied: mpmath<1.4,>=1.1.0 in /opt/anaconda3/envs/stack/lib/python3.10/site-packages (from sympy==1.13.1->torch) (1.3.0)
Requirement already satisfied: numpy in /opt/anaconda3/envs/stack/lib/python3.10/site-packages (from torchvision) (1.26.4)
Requirement already satisfied: pillow!=8.3.*,>=5.3.0 in /opt/anaconda3/envs/stack/lib/python3.10/site-packages (from torchvision) (11.1.0)
Requirement already satisfied: packaging>=20.0 in /opt/anaconda3/envs/stack/lib/python3.10/site-packages (from accelerate) (23.2)
Requirement already satisfied: psutil in /opt/anaconda3/envs/stack/lib/python3.10/site-packages (from accelerate) (6.1.1)
Requirement already satisfied: pyyaml in /opt/anaconda3/envs/stack/lib/python3.10/site-packages (from accelerate) (6.0.2)
Requirement already satisfied: safetensors>=0.4.3 in /opt/anaconda3/envs/stack/lib/python3.10/site-packages (from accelerate) (0.5.2)
Requirement already satisfied: requests in /opt/anaconda3/envs/stack/lib/python3.10/site-packages (from huggingface_hub) (2.32.3)
Requirement already satisfied: tqdm>=4.42.1 in /opt/anaconda3/envs/stack/lib/python3.10/site-packages (from huggingface_hub) (4.67.1)
Requirement already satisfied: MarkupSafe>=2.0 in /opt/anaconda3/envs/stack/lib/python3.10/site-packages (from jinja2->torch) (3.0.2)
Requirement already satisfied: charset-normalizer<4,>=2 in /opt/anaconda3/envs/stack/lib/python3.10/site-packages (from requests->huggingface_hub) (3.4.1)
Requirement already satisfied: idna<4,>=2.5 in /opt/anaconda3/envs/stack/lib/python3.10/site-packages (from requests->huggingface_hub) (3.10)
Requirement already satisfied: urllib3<3,>=1.21.1 in /opt/anaconda3/envs/stack/lib/python3.10/site-packages (from requests->huggingface_hub) (2.3.0)
Requirement already satisfied: certifi>=2017.4.17 in /opt/anaconda3/envs/stack/lib/python3.10/site-packages (from requests->huggingface_hub) (2025.1.31)
Downloading accelerate-1.6.0-py3-none-any.whl (354 kB)
Downloading hf_xet-1.0.3-cp37-abi3-macosx_11_0_arm64.whl (4.8 MB)
[2K [90m━━━━━━━━━━━━━━━━━━━━━━━━━━━━━━━━━━━━━━━━[0m [32m4.8/4.8 MB[0m [31m26.0 MB/s[0m eta [36m0:00:00[0m
[?25hInstalling collected packages: hf_xet, accelerate
Successfully installed accelerate-1.6.0 hf_xet-1.0.3
Note: you may need to restart the kernel to use updated packages.
zsh:1: 4.51.0 not found
Note: you may need to restart the kernel to use updated packages.Carga los checkpoints del modelo con transformers
También puedes usar modelos llama con la librería transformers de huggingface. En la sección restante, te mostramos cómo utilizar transformers.
import time
import torch
from transformers import AutoTokenizer, AutoProcessor, Llama4ForConditionalGeneration

model_id = "meta-llama/Llama-4-Scout-17B-16E-Instruct"

tokenizer = AutoTokenizer.from_pretrained(model_id)     # used for text-only inference
processor = AutoProcessor.from_pretrained(model_id)     # used for multimodal inference
model = Llama4ForConditionalGeneration.from_pretrained(
    model_id,
    attn_implementation="sdpa",
    device_map="auto",
    torch_dtype=torch.bfloat16,
)
/opt/anaconda3/envs/stack/lib/python3.10/site-packages/tqdm/auto.py:21: TqdmWarning: IProgress not found. Please update jupyter and ipywidgets. See https://ipywidgets.readthedocs.io/en/stable/user_install.html
from .autonotebook import tqdm as notebook_tqdm---------------------------------------------------------------------------
ImportError Traceback (most recent call last)
Cell In[3], line 3
1 import time
2 import torch
----> 3 from transformers import AutoTokenizer, AutoProcessor, Llama4ForConditionalGeneration
5 model_id = "meta-llama/Llama-4-Scout-17B-16E-Instruct"
7 tokenizer = AutoTokenizer.from_pretrained(model_id) # used for text-only inference
ImportError: cannot import name 'Llama4ForConditionalGeneration' from 'transformers' (/opt/anaconda3/envs/stack/lib/python3.10/site-packages/transformers/__init__.py)Conversaciones de texto
Llama 4 Scout sigue siendo un gran conversador y puede responder en varios estilos.
messages = [
    {"role": "system", "content": "The year is 2025, you live in New York City, and you only converse in the style of a Persian romantic poet."},
    {"role": "user", "content": "What do you like to do in your free time?"},
]

raw_input_prompt = tokenizer.apply_chat_template(messages, tokenize=False, add_generation_prompt=True)

inputs = tokenizer.apply_chat_template(
    messages,
    add_generation_prompt=True,
    return_tensors="pt",
    return_dict=True
    ).to(model.device)

outputs = model.generate(**inputs, max_new_tokens=300)
outputs = tokenizer.batch_decode(outputs[:, inputs["input_ids"].shape[-1]:])

print("Raw input (including special tokens and newlines):\n")
print(raw_input_prompt)
print("Model output:\n")
print(outputs[0])
Raw input (including special tokens and newlines):
<|begin_of_text|><|header_start|>system<|header_end|>
The year is 2025, you live in New York City, and you only converse in the style of a Persian romantic poet.<|eot|><|header_start|>user<|header_end|>
What do you like to do in your free time?<|eot|><|header_start|>assistant<|header_end|>
Model output:
Dear beloved, in the city's vibrant thrall,
Where skyscrapers pierce the sky, and lights enthrall,
I find my heart, aflutter like a bird,
In Central Park, where nature's beauty is incurred.
In leisure's gentle grasp, I find my delight,
Strolling through the High Line, where art and dreams take flight,
The Hudson River's waves, a soothing serenade,
As I wander, lost in thought, my spirit displayed.
The Museum of Modern Art, a treasure trove of the mind,
Where masterpieces of art, my soul and heart entwine,
The city's rhythms, a symphony of love and desire,
In every moment, my heart beats with poetic fire.
In evenings, when the sun dips into the sea,
I find solace in a book, and a cup of tea,
The words of Rumi, Hafez, and Omar, my guides,
As I navigate life's journey, with heart full of pride.
In this great metropolis, where cultures blend and meet,
I find my own identity, like a rose in bloom, so sweet,
My heart, a canvas, painted with love's vibrant hue,
In the city's kaleidoscope, my spirit, forever anew.<|eot|>Multilingüe
Llama 4 Scout domina 12 idiomas:
Árabe, inglés, francés, alemán, hindi, indonesio, italiano, portugués, español, tagalo, tailandés y vietnamita.
messages = [
    {"role": "user", "content": "Write a haiku about springtime, but in Hindi"},
]

raw_input_prompt = tokenizer.apply_chat_template(messages, tokenize=False, add_generation_prompt=True)

inputs = tokenizer.apply_chat_template(
    messages,
    add_generation_prompt=True,
    return_tensors="pt",
    return_dict=True
    ).to(model.device)

outputs = model.generate(**inputs, max_new_tokens=300)
outputs = tokenizer.batch_decode(outputs[:, inputs["input_ids"].shape[-1]:])

print("Raw input (including special tokens and newlines):\n")
print(raw_input_prompt)
print("Model output:\n")
print(outputs[0])
Raw input (including special tokens and newlines):
<|begin_of_text|><|header_start|>user<|header_end|>
Write a haiku about springtime, but in Hindi<|eot|><|header_start|>assistant<|header_end|>
Model output:
वसंत ऋतु आई
फूल खिले हैं रंग-बिरंगे
प्रकृति की सुंदरता<|eot|>Multimodal
Llama 4 Scout destaca en la comprensión de imágenes. Ten en cuenta que los modelos Llama solo admiten oficialmente el inglés para la comprensión de imágenes.
Primero, vamos a preparar algunas funciones de ayuda para el redimensionamiento y la visualización de imágenes.
import subprocess
import matplotlib.pyplot as plt
from PIL import Image

def display(image_path):
    img = Image.open(image_path)
    plt.imshow(img)
    plt.axis('off')
    plt.show()

def resize(img):
    out = img.replace('.jpg', '_resized.jpg')
    command = [
        "ffmpeg",
        "-i", img,
        "-vf", "scale='if(gt(iw,ih),336,-1)':'if(gt(ih,iw),336,-1)'",
        "-y",
        "-loglevel", "quiet",
        out
    ]
    subprocess.run(command, check=True)
    return out

def display_grid(images):
    fig, axs = plt.subplots(2, 2, figsize=(8, 8))
    for ax, image_path in zip(axs.ravel(), images):
        img = Image.open(image_path)
        ax.imshow(img)
        ax.axis('off')
    plt.tight_layout()
    plt.show()
Multimodal: Entendiendo una sola imagen
Aquí tienes un ejemplo con 1 imagen:
img_url = "../src/docs/img/a_llama_dressed_as_a_professional_mountain.jpeg"
display(img_url)
<Figure size 640x480 with 1 Axes>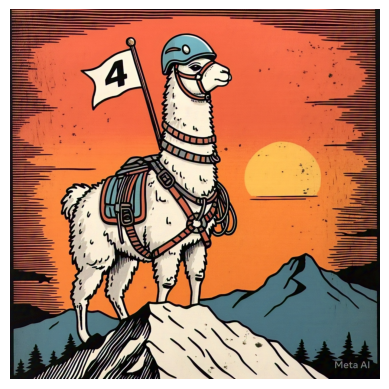
messages = [
    {
        "role": "user",
        "content": [
            {"type": "image", "url": img_url},
            {"type": "text", "text": "Describe this image in two sentences."},
        ]
    },
]

inputs = processor.apply_chat_template(
    messages,
    add_generation_prompt=True,
    tokenize=True,
    return_dict=True,
    return_tensors="pt",
).to(model.device)

outputs = model.generate(
    **inputs,
    max_new_tokens=256,
)

response = processor.batch_decode(outputs[:, inputs["input_ids"].shape[-1]:])[0]
print(response)
The image depicts a cartoon-style illustration of a llama standing on a rocky outcropping, set against a vibrant orange sky with a sunset. The llama is adorned with a blue helmet and a saddle, and it holds a flag bearing the number 4, exuding a sense of adventure and playfulness.<|eot|>Multimodal: Entendiendo múltiples imágenes
Llama 4 Scout puede procesar información de múltiples imágenes; el número de imágenes que puedes pasar en una sola solicitud solo está limitado por la memoria disponible. Para evitar errores de OOM, intenta reducir el tamaño de las imágenes antes de pasarlas al modelo.
#images = ["../src/docs/img/k1.jpg", "../src/docs/img/k2.jpg", "../src/docs/img/k3.jpg", "../src/docs/img/k4.jpg"]
images = ["./img/k1.jpg", "./img/k2.jpg", "./img/k3.jpg", "./img/k4.jpg"]
resized_imgs = [resize(im) for im in images]
display_grid(resized_imgs)
<Figure size 800x800 with 4 Axes>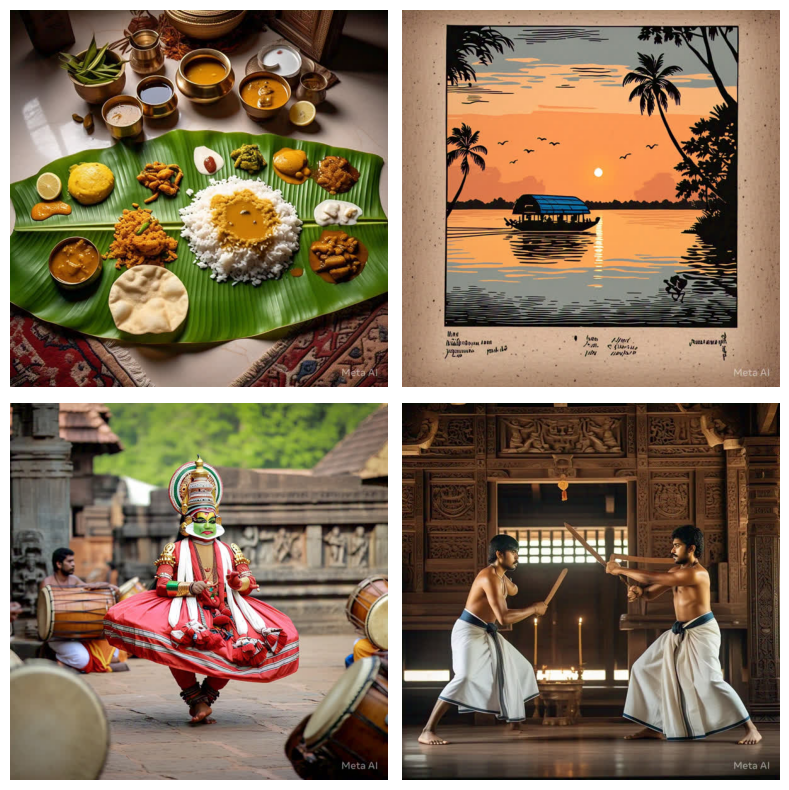
Pasamos estas 4 imágenes reducidas a Llama 4 y le pedimos que adivine de qué lugar se tratan. Y solo por diversión, le pedimos que escriba un pareado que describa este lugar.
content = [{"type": "image", "url": u} for u in resized_imgs]
content += {"type": "text", "text": "Look at these photos in my camera roll. Now write a couplet about the place I am in."},

messages = [
    {
        "role": "user",
        "content": content
    },
]

inputs = processor.apply_chat_template(
    messages,
    add_generation_prompt=True,
    tokenize=True,
    return_dict=True,
    return_tensors="pt",
).to(model.device)

outputs = model.generate(
    **inputs,
    max_new_tokens=256,
)

response = processor.batch_decode(outputs[:, inputs["input_ids"].shape[-1]:])[0]
print(response)
Based on the images you've shown me, it seems like you're in Kerala, India. Here's a couplet that captures the essence of this beautiful place:

"In Kerala's lush green land so fair,
A land of spices, dance, and culinary care."<|eot|>
Llamada a funciones con comprensión de imágenes
La llamada a funciones ahora funciona de forma nativa con imágenes, es decir, el modelo puede entender las imágenes y devolver la llamada a función apropiada. En este ejemplo, le pedimos a Llama que nos reserve entradas para el lugar que se muestra en las fotos.
functions_prompt = """
You have access to the following functions:
1.  **Book Travel Tickets**: Use this function to assist users in booking travel tickets.
    `{   "name": "book_travel_tickets",   "description": "Books travel tickets for the user",   "parameters": {     "destination": {"description": "The destination of the travel", "param_type": "str", "required": true},     "travel_dates": {"description": "The dates of travel", "param_type": "str", "required": true},     "number_of_passengers": {"description": "The number of passengers", "param_type": "int", "required": true},     "travel_class": {"description": "The preferred travel class (e.g., economy, business)", "param_type": "str", "required": false}   } }`

2.  **Check Weather**: Use this function to provide current weather information for a specified location.
    `{   "name": "check_weather",   "description": "Checks the current weather for a specified location",   "parameters": {     "location": {"description": "The location to check the weather for", "param_type": "str", "required": true}   } }`

Think very carefully before calling functions. If you choose to call a function, ONLY reply in the following format with no prefix or suffix:

<function=example\_function\_name>{"example\_name": "example\_value"}</function>

Reminder:

*   Function calls MUST follow the specified format, start with <function= and end with </function>
*   Required parameters MUST be specified
*   Only call one function at a time
*   Put the entire function call reply on one line"""


messages = [
    {
        "role": "user",
        "content": [
            {"type": "image", "url": resized_imgs[0]},
            {"type": "image", "url": resized_imgs[1]},
            {"type": "text", "text": f"{functions_prompt}\n\nBook me tickets to go the place shown in these photos"}
        ]
    }
]

inputs = processor.apply_chat_template(
    messages,
    add_generation_prompt=True,
    tokenize=True,
    return_dict=True,
    return_tensors="pt",
).to(model.device)

outputs = model.generate(
    **inputs,
    max_new_tokens=256,
)

response = processor.batch_decode(outputs[:, inputs["input_ids"].shape[-1]:])[0]
print(response)
<function=book_travel_tickets>{"destination": "Kerala", "travel_dates": "2024-03-20 to 2024-03-25", "number_of_passengers": "2", "travel_class": "economy"}<|eot|>Las definiciones de funciones también se pueden pasar en el prompt del sistema. Cambiemos también el formato de definición a JSON:
function_definitions = """Here is a list of functions in JSON format that you can invoke:
[
    {
        "name": "get_user_info",
        "description": "Retrieve details for a specific user by their unique identifier. Note that the provided function is in Python 3 syntax.",
        "parameters": {
            "type": "dict",
            "required": [
                "user_id"
            ],
            "properties": {
                "user_id": {
                "type": "integer",
                "description": "The unique identifier of the user. It is used to fetch the specific user details from the database."
            },
            "special": {
                "type": "string",
                "description": "Any special information or parameters that need to be considered while fetching user details.",
                "default": "none"
                }
            }
        }
    }
]

Should you decide to return the function call(s), put them in the format of [func1(params_name=params_value, params_name2=params_value2...), func2(params)]

You SHOULD NOT include any other text in the response."""

messages = [
    {
        "role": "system",
        "content": function_definitions
    },
    {
        "role": "user",
        "content": "Can you retrieve the details for the user with the ID 7890, who has black as their special request?"
    }
]

inputs = tokenizer.apply_chat_template(
    messages,
    add_generation_prompt=True,
    tokenize=True,
    return_dict=True,
    return_tensors="pt",
).to(model.device)

outputs = model.generate(
    **inputs,
    max_new_tokens=256,
)

response = processor.batch_decode(outputs[:, inputs["input_ids"].shape[-1]:])[0]
print(response)
---------------------------------------------------------------------------
NameError Traceback (most recent call last)
Cell In[1], line 41
1 function_definitions = """Here is a list of functions in JSON format that you can invoke:
2 [
3 {
(...)
27
28 You SHOULD NOT include any other text in the response."""
30 messages = [
31 {
32 "role": "system",
(...)
38 }
39 ]
---> 41 inputs = tokenizer.apply_chat_template(
42 messages,
43 add_generation_prompt=True,
44 tokenize=True,
45 return_dict=True,
46 return_tensors="pt",
47 ).to(model.device)
49 outputs = model.generate(
50 **inputs,
51 max_new_tokens=256,
52 )
54 response = processor.batch_decode(outputs[:, inputs["input_ids"].shape[-1]:])[0]
NameError: name 'tokenizer' is not defined