Uso de herramientas en la API multimodal en vivo de Gemini 2
Copyright 2026 Google LLC.
# @title Licensed under the Apache License, Version 2.0 (the "License");
# you may not use this file except in compliance with the License.
# You may obtain a copy of the License at
#
# https://www.apache.org/licenses/LICENSE-2.0
#
# Unless required by applicable law or agreed to in writing, software
# distributed under the License is distributed on an "AS IS" BASIS,
# WITHOUT WARRANTIES OR CONDITIONS OF ANY KIND, either express or implied.
# See the License for the specific language governing permissions and
# limitations under the License.
En este notebook, aprenderás a usar herramientas, incluyendo herramientas de gráficos, Google Search y ejecución de código en la API multimodal en vivo de Gemini 2. Para una descripción general de las nuevas capacidades, consulta la documentación de Gemini 2.
Este notebook está escrito en Python y usa el protocolo seguro Websockets directamente, no usa el SDK de GenAI.
Si no buscas código y solo quieres probar la transmisión multimedia, usa la API en vivo en Google AI Studio.
Configuración
%pip install -q 'websockets~=14.0' altair[?25l [90m━━━━━━━━━━━━━━━━━━━━━━━━━━━━━━━━━━━━━━━━[0m [32m0.0/169.9 kB[0m [31m?[0m eta [36m-:--:--[0m
[2K [90m━━━━━━━━━━━━━━━━━━━━━━━━━━━━━━━━━━━━━━━━[0m [32m169.9/169.9 kB[0m [31m5.1 MB/s[0m eta [36m0:00:00[0m
[?25hConfigura tu clave de API
Para ejecutar la siguiente celda, tu clave de API debe estar almacenada en un Secreto de Colab llamado GEMINI_API_KEY. Si aún no tienes una clave de API o no estás seguro de cómo crear un Secreto de Colab, consulta el inicio rápido de Autenticación  para ver un ejemplo.
import os
from google.colab import userdata

GEMINI_API_KEY = userdata.get('GEMINI_API_KEY')
Las API multimodales en vivo son una nueva capacidad introducida con el modelo Gemini 2.0. No funcionarán con modelos de generaciones anteriores.
También necesitas establecer la versión del cliente en v1alpha.
uri = f"wss://generativelanguage.googleapis.com/ws/google.ai.generativelanguage.v1beta.GenerativeService.BidiGenerateContent?key={GEMINI_API_KEY}"
model = "models/gemini-2.5-flash-native-audio-preview-09-2025"
Configura algunas funciones de ayuda
Antes de interactuar con la API, define algunas funciones de ayuda que necesitarás en este codelab.
En este notebook, almacenarás en búfer las respuestas de audio PCM transmitidas, así que crea un administrador de contexto para envolver los datos de audio PCM en un archivo de audio wave con los parámetros de audio relevantes. De esta manera, puedes reproducir el audio directamente dentro de Colab.
import contextlib
import wave

@contextlib.contextmanager
def wave_file(filename, channels=1, rate=24000, sample_width=2):
  """Define a wave context manager using the audio parameters supplied."""
  with wave.open(filename, "wb") as wf:
    wf.setnchannels(channels)
    wf.setsampwidth(sample_width)
    wf.setframerate(rate)
    yield wf
Usa un registrador personalizado para que puedas alternar fácilmente el nivel de registro y ver las solicitudes y respuestas en curso de la API.
import logging
logger = logging.getLogger("Live")
# Switch to "DEBUG" to see the in-flight requests & responses
logger.setLevel("INFO")
Define funciones de conexión
Este código define algunas funciones que se conectarán (quick_connect), ejecutarán y manejarán prompts (run) y manejarán respuestas específicas del servidor (handle_tool_call, handle_server_content).
Este código usa el paquete PyPI websockets, específicamente la interfaz asíncrona disponible en la versión 14.0 y no funcionará con paquetes significativamente más antiguos.
import asyncio
import base64
import json
import time

from websockets.asyncio.client import connect
from IPython import display


async def setup(ws, modality, tools):
  """Perform a setup handshake to configure the conversation."""
  setup = {
      "setup": {
          "model": model,
          "tools": tools,
          "generation_config": {
              "response_modalities": [modality]
          }
      }
  }
  setup_json = json.dumps(setup)
  logger.debug(">>> " + setup_json)
  await ws.send(setup_json)

  setup_response = json.loads(await ws.recv())
  logger.debug("<<< " + json.dumps(setup_response))

async def send(ws, prompt):
  """Send a user content message (only text is supported)."""
  msg = {
    "client_content": {
      "turns": [{"role": "user", "parts": [{"text": prompt}]}],
      "turn_complete": True,
    }
  }
  json_msg = json.dumps(msg)
  logger.debug(">>> " + json_msg)
  await ws.send(json_msg)


def handle_server_content(wf, server_content):
  """Handle any server content messages, e.g. incoming audio or text."""
  audio = False
  model_turn = server_content.pop("modelTurn", None)
  if model_turn:
    text = model_turn["parts"][0].pop("text", None)
    if text:
      print(text, end='')

    inline_data = model_turn['parts'][0].pop('inlineData', None)
    if inline_data:
      print('.', end='')
      b64data = inline_data['data']
      pcm_data = base64.b64decode(b64data)
      wf.writeframes(pcm_data)
      audio = True

  turn_complete = server_content.pop('turnComplete', None)
  return turn_complete, audio


async def handle_tool_call(ws, tool_call, responses):
  """Process an incoming tool call request, returning a response."""
  logger.debug("<<< " + json.dumps(tool_call))
  for fc in tool_call['functionCalls']:

    if fc['name'] in responses:
      # Use a response from `responses` if provided.
      result_entry = responses[fc['name']]
      # If it's a function, actuall call it.
      if callable(result_entry):
        result = result_entry(**fc['args'])
    else:
      # Otherwise it's a stub, just say "OK"
      result = {'string_value': 'ok'}

    msg = {
      'tool_response': {
          'function_responses': [{
              'id': fc['id'],
              'name': fc['name'],
              'response': {'result': result}
          }]
        }
    }
    json_msg = json.dumps(msg)
    logger.debug(">>> " + json_msg)
    await ws.send(json_msg)


@contextlib.asynccontextmanager
async def quick_connect(modality='TEXT', tools=()):
  """Establish a connection and keep it open while the context is active."""
  async with connect(uri, additional_headers={"Content-Type": "application/json"}) as ws:
    await setup(ws, modality, tools)
    yield ws


audio_lock = time.time()

async def run(ws, prompt, responses=()):
  """Send the provided prompt and handle the streamed response."""
  print('>', prompt)
  await send(ws, prompt)

  audio = False
  filename = 'audio.wav'
  with wave_file(filename) as wf:
    async for raw_response in ws:
      response = json.loads(raw_response.decode())
      logger.debug("<<< " + str(response)[:150])

      server_content = response.pop("serverContent", None)
      if server_content:
        turn_complete, a = handle_server_content(wf, server_content)
        audio = audio or a

        if turn_complete:
          print()
          print('<Turn complete>')
          break

      tool_call = response.pop('toolCall', None)
      if tool_call:
        await handle_tool_call(ws, tool_call, responses)

  if audio:
    global audio_lock
    # Sleep before playing audio to make sure it doesn't play over an existing clip.
    if (delta := audio_lock - time.time()) > 0:
      print('Pausing for audio to complete...')
      await asyncio.sleep(delta + 1.0)  # include a buffer so there's a breather

    display.display(display.Audio(filename, autoplay=True))
    audio_lock = time.time() + (wf.getnframes() / wf.getframerate())
Usa la API
Ejemplo de un solo turno
Ahora, veamos cómo encajan todas las piezas que has definido en un ejemplo simple. Enviarás un solo prompt a la API y observarás la respuesta.
Este ejemplo usa el administrador de contexto quick_connect para crear una conexión a la API. Mientras estés dentro del bloque `async with`, la conexión permanece activa y es accesible a través de la variable `ws`. Luego, usa la función `run` para enviar nuestro prompt y procesar la respuesta de la API.
Haz una solicitud simple para entender cómo funciona el código anterior. Se crea una conexión a través de un administrador de contexto usando quick_connect, y mientras el contexto está activo, la conexión de websocket se almacena en ws y se pasa a las llamadas run posteriores que ejecutan los prompts.
Ten en cuenta que puedes cambiar la modalidad de AUDIO a TEXT y ajustar el prompt.
tools = [
    {'google_search': {}},
    {'code_execution': {}},
]

async def go():
  async with quick_connect(tools=tools, modality="TEXT") as ws:
    await run(ws, "Please find the last 5 Denis Villeneuve movies and look up their runtimes and the year published.")

logger.setLevel('INFO')
await go()
> Please find the last 5 Denis Villeneuve movies and look up their runtimes and the year published.
Based on the search results, the last 5 Denis Villeneuve movies are:
1. *Dune: Part Two* (2024)
2. *Dune: Part One* (2021)
3. *Blade Runner 2049* (2017)
4. *Arrival* (2016)
5. *Sicario* (2015)
Now, let's find the runtimes for these movies.
Here's a summary of the last 5 Denis Villeneuve movies, their release year, and runtime:
* **Dune: Part Two** (2024): 166 minutes (2 hours 46 minutes)
* **Dune: Part One** (2021): 155 minutes (2 hours 35 minutes)
* **Blade Runner 2049** (2017): 163 minutes (2 hours 43 minutes)
* **Arrival** (2016): 116 minutes (1 hour 56 minutes)
* **Sicario** (2015): 121 minutes (2 hours 1 minute)
<Turn complete>Ejemplo complejo de múltiples herramientas
Ahora define herramientas adicionales. Agrega una herramienta para gráficos definiendo un esquema (en altair_fns), una función para ejecutar (render_altair) y conecta las dos usando el mapeo tool_calls.
La herramienta de gráficos utilizada aquí es Vega-Altair, una "biblioteca declarativa de visualización estadística para Python". Altair admite la persistencia de gráficos usando JSON, que expondrás como una herramienta para que el modelo Gemini pueda producir un gráfico.
El código auxiliar definido anteriormente se ejecutará tan pronto como pueda, pero el audio tarda un tiempo en reproducirse, por lo que es posible que veas la salida de turnos posteriores mostrada antes de que se haya reproducido el audio.
import altair as alt
from google.api_core import retry


def apply_altair_theme(altair_json: str, theme: str) -> str:
  chart = alt.Chart.from_json(altair_json)
  with alt.themes.enable(theme):
    themed_altair_json = chart.to_json()
  return themed_altair_json


@retry.Retry()
def render_altair(altair_json: str, theme: str = "default"):
  themed_altair_json = apply_altair_theme(altair_json, theme)
  chart = alt.Chart.from_json(themed_altair_json)
  chart.display()

  return {'string_value': 'ok'}


altair_fns = [
  {
    'name': 'render_altair',
    'description': 'Displays an Altair chart in JSON format.',
    'parameters': {
      'type': 'OBJECT',
      'properties': {
        'altair_json': {
            'type': 'STRING',
            'description': 'JSON STRING representation of the Altair chart to render. Must be a string, not a json object',
        },
        'theme': {
            'type': 'STRING',
            'description': 'Altair theme. Choose from one of "dark", "ggplot2", "default", "opaque".',
        },
      },
    },
  },
]

tool_calls = {
    'render_altair': render_altair,
}
Ahora, junta todo eso en una conversación de chat. Este código abre una sesión de transmisión (con quick_connect), y cada invocación de run enviará el prompt de texto, leerá la respuesta transmitida (y la almacenará en búfer si es audio), manejará cualquier respuesta del servidor (como llamadas a herramientas) y finalmente regresará una vez que se haya enviado la señal de fin de turno.
Al secuenciar múltiples llamadas run dentro de una sesión quick_connect, estás ejecutando una conversación de múltiples turnos y transmitida. Una vez que el código llega al final del bloque quick_connect, la sesión se termina.
tools = [
    {'google_search': {}},
    {'code_execution': {}},
    {'function_declarations': altair_fns},
]

async def go():
  async with quick_connect(tools=tools, modality="AUDIO") as ws:

    # Google Search
    await run(ws, "Please find the last 5 Denis Villeneuve movies and find their runtimes.")
    # Code execution
    await run(ws, "Can you write some code to work out which has the longest and shortest runtimes?")
    # Tool use
    await run(ws, "Now can you plot them in a line chart showing the year on the x-axis and runtime on the y-axis?", responses=tool_calls)
    # Tool use - this step takes user input, so you can ask the model to tweak the chart to your liking.
    # Try changing to dark mode, or lay out the data differently.
    await run(ws, input('Any requests? > '), responses=tool_calls)


logger.setLevel('INFO')
await go()
> Please find the last 5 Denis Villeneuve movies and find their runtimes.
.......................................................................................................................
<Turn complete><IPython.lib.display.Audio object>> Can you write some code to work out which has the longest and shortest runtimes?
.....................................................
<Turn complete>
Pausing for audio to complete...<IPython.lib.display.Audio object>> Now can you plot them in a line chart showing the year on the x-axis and runtime on the y-axis?<ipython-input-10-14ecbacb69f1>:7: AltairDeprecationWarning:
Deprecated since `altair=5.5.0`. Use altair.theme instead.
Most cases require only the following change:
# Deprecated
alt.themes.enable('quartz')
# Updated
alt.theme.enable('quartz')
If your code registers a theme, make the following change:
# Deprecated
def custom_theme():
return {'height': 400, 'width': 700}
alt.themes.register('theme_name', custom_theme)
alt.themes.enable('theme_name')
# Updated
@alt.theme.register('theme_name', enable=True)
def custom_theme():
return alt.theme.ThemeConfig(
{'height': 400, 'width': 700}
)
See the updated User Guide for further details:
https://altair-viz.github.io/user_guide/api.html#theme
https://altair-viz.github.io/user_guide/customization.html#chart-themes
with alt.themes.enable(theme):alt.Chart(...)....................................................
<Turn complete><IPython.lib.display.Audio object>Any requests? > can you add the movie names into the dots as also make it in a dark theme?
> can you add the movie names into the dots as also make it in a dark theme?alt.LayerChart(...).............................
<Turn complete><IPython.lib.display.Audio object>Ejemplo de mapas
Para este ejemplo, usarás la API estática de Google Maps para dibujar en un mapa durante la conversación. Necesitarás asegurarte de que tu clave de API esté habilitada para la API estática de Google Maps. Puede ser la misma clave de API que usaste para la API de Gemini, o una nueva, siempre y cuando la API de mapas estáticos esté habilitada.
Agrega la clave en los Secretos de Colab, o agrégala directamente en el código (MAPS_API_KEY = 'AIza...').
from google.colab import userdata
MAPS_API_KEY = userdata.get('MAPS_API_KEY')
La siguiente celda está oculta por defecto, pero debe ejecutarse. Contiene el esquema de la función para la función draw_map, incluyendo algo de documentación sobre cómo dibujar marcadores con la API de Google Maps.
Ten en cuenta que el modelo necesita producir un conjunto de parámetros bastante complejo para llamar a draw_map, incluyendo la definición de un punto central para el mapa, un nivel de zoom entero y estilos y ubicaciones de marcadores personalizados.
# @title Map tool schema (run this cell)

map_fns = [
  {
    'name': 'draw_map',
    'description': 'Render a Google Maps static map using the specified parameters. No information is returned.',
    'parameters': {
      'type': 'OBJECT',
      'properties': {
        'center': {
            'type': 'STRING',
            'description': 'Location to center the map. It can be a lat,lng pair (e.g. 40.714728,-73.998672), or a string address of a location (e.g. Berkeley,CA).',
        },
        'zoom': {
            'type': 'NUMBER',
            'description': 'Google Maps zoom level. 1 is the world, 20 is zoomed in to building level. Integer only. Level 11 shows about a 15km radius. Level 9 is about 30km radius.'
        },
        'path': {
            "type": "STRING",
            'description': """The path parameter defines a set of one or more locations connected by a path to overlay on the map image. The path parameter takes set of value assignments (path descriptors) of the following format:

path=pathStyles|pathLocation1|pathLocation2|... etc.

Note that both path points are separated from each other using the pipe character (|). Because both style information and point information is delimited via the pipe character, style information must appear first in any path descriptor. Once the Maps Static API server encounters a location in the path descriptor, all other path parameters are assumed to be locations as well.

Path styles
The set of path style descriptors is a series of value assignments separated by the pipe (|) character. This style descriptor defines the visual attributes to use when displaying the path. These style descriptors contain the following key/value assignments:

weight: (optional) specifies the thickness of the path in pixels. If no weight parameter is set, the path will appear in its default thickness (5 pixels).
color: (optional) specifies a color either as a 24-bit (example: color=0xFFFFCC) or 32-bit hexadecimal value (example: color=0xFFFFCCFF), or from the set {black, brown, green, purple, yellow, blue, gray, orange, red, white}.

When a 32-bit hex value is specified, the last two characters specify the 8-bit alpha transparency value. This value varies between 00 (completely transparent) and FF (completely opaque). Note that transparencies are supported in paths, though they are not supported for markers.

fillcolor: (optional) indicates both that the path marks off a polygonal area and specifies the fill color to use as an overlay within that area. The set of locations following need not be a "closed" loop; the Maps Static API server will automatically join the first and last points. Note, however, that any stroke on the exterior of the filled area will not be closed unless you specifically provide the same beginning and end location.
geodesic: (optional) indicates that the requested path should be interpreted as a geodesic line that follows the curvature of the earth. When false, the path is rendered as a straight line in screen space. Defaults to false.
Some example path definitions:

Thin blue line, 50% opacity: path=color:0x0000ff80|weight:1
Solid red line: path=color:0xff0000ff|weight:5
Solid thick white line: path=color:0xffffffff|weight:10
These path styles are optional. If default attributes are desired, you may skip defining the path attributes; in that case, the path descriptor's first "argument" will consist instead of the first declared point (location).

Path points
In order to draw a path, the path parameter must also be passed two or more points. The Maps Static API will then connect the path along those points, in the specified order. Each pathPoint is denoted in the pathDescriptor separated by the | (pipe) character.
""",
        },
        'markers': {
            "type": "ARRAY",
            "items": {
                "type": "STRING"
            },
            # Copied from https://developers.google.com/maps/documentation/maps-static/start#Markers
            'description': """The markers parameter defines a set of one or more markers (map pins) at a set of locations. Each marker defined within a single markers declaration must exhibit the same visual style; if you wish to display markers with different styles, you will need to supply multiple markers parameters with separate style information.

The markers parameter takes set of value assignments (marker descriptors) of the following format:

markers=markerStyles|markerLocation1| markerLocation2|... etc.

The set of markerStyles is declared at the beginning of the markers declaration and consists of zero or more style descriptors separated by the pipe character (|), followed by a set of one or more locations also separated by the pipe character (|).

Because both style information and location information is delimited via the pipe character, style information must appear first in any marker descriptor. Once the Maps Static API server encounters a location in the marker descriptor, all other marker parameters are assumed to be locations as well.

Marker styles
The set of marker style descriptors is a series of value assignments separated by the pipe (|) character. This style descriptor defines the visual attributes to use when displaying the markers within this marker descriptor. These style descriptors contain the following key/value assignments:

size: (optional) specifies the size of marker from the set {tiny, mid, small}. If no size parameter is set, the marker will appear in its default (normal) size.
color: (optional) specifies a 24-bit color (example: color=0xFFFFCC) or a predefined color from the set {black, brown, green, purple, yellow, blue, gray, orange, red, white}.

Note that transparencies (specified using 32-bit hex color values) are not supported in markers, though they are supported for paths.

label: (optional) specifies a single uppercase alphanumeric character from the set {A-Z, 0-9}. (The requirement for uppercase characters is new to this version of the API.) Note that default and mid sized markers are the only markers capable of displaying an alphanumeric-character parameter. tiny and small markers are not capable of displaying an alphanumeric-character.
""",
        }
      },
      "required": [
        "center",
        "zoom",
      ]

    },
  },
]
Ahora define la función draw_map y agrega google_search como una herramienta para usar en esta conversación. Esto permitirá que el modelo busque restaurantes que puedan ser populares.
from urllib.parse import urlencode

import altair as alt
from google.api_core import retry
import requests


def draw_map(center, zoom, path: str = "", markers: list[str] = ()):
  logger.debug(f'MAPS: {center=} {zoom=} {path=} {markers=}')
  q = {
      'key': MAPS_API_KEY,
      'size': '512x512',
      'center': center,
      'zoom': zoom,
  }

  if path:
    q['path'] = path

  qs = list(q.items())

  for marker in markers:
    qs.append(('markers', marker))

  url = f'https://maps.googleapis.com/maps/api/staticmap?{urlencode(qs)}'
  display.display(display.Image(url=url))
  logger.debug(f"Map URL: {url}")

  return {'string_value': f'ok'}


tool_calls = {
    'draw_map': draw_map,
}

tools = [
    {'google_search': {}},
    {'function_declarations': map_fns},
]
Finalmente, define y ejecuta la conversación.
async def go():
  async with quick_connect(tools=tools, modality="TEXT") as ws:

    # Google Search + Tools (Maps)
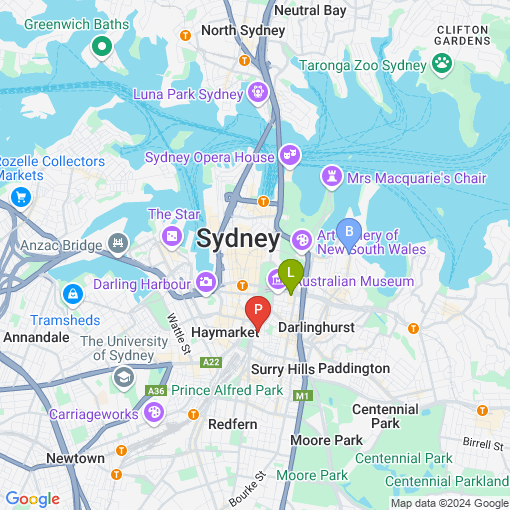
    await run(ws, "Please look up and mark 3 Sydney restaurants that are currently trending on a map.", responses=tool_calls)
    # Code execution + Tools
    await run(ws, "Now write some code to randomly pick one to eat at tonight and zoom in to that one on the map.", responses=tool_calls)


logger.setLevel('INFO')
await go()
La salida de la primera imagen se verá algo así. No te preocupes si la tuya es ligeramente diferente, hay muchos restaurantes populares y muchas formas de estilizar un mapa. Siempre puedes pedirle al modelo una guía más específica si lo deseas.
Mapas con ejecución de código
En este ejemplo, usarás las herramientas de Google Maps definidas anteriormente y desafiarás al modelo a generar un gradiente de color y usarlo para representar visualmente datos en un mapa. Esta tarea requiere ejecución de código, por lo que también se incluye como una herramienta.
Específicamente, le pedirás al modelo que trace las capitales de Australia y aplique un gradiente entre dos colores en dirección circular alrededor del país usando marcadores de Google Maps.
from urllib.parse import urlencode

import altair as alt
from google.api_core import retry


tool_calls = {
    'draw_map': draw_map,
}

tools = [
    {'code_execution': {}},
    {'function_declarations': map_fns},
]

async def go():
  async with quick_connect(tools=tools, modality="TEXT") as ws:

    # Code exec and tool use. No search.
    await run(ws, "Plot markers on every capital city in Australia using a gradient between "
                  "Orange and Green. Plan out your steps first, then follow the plan.", responses=tool_calls)

    await run(ws, "Awesome! Can you ensure the gradient is applied smoothly in a circular direction "
                  "around the country?", responses=tool_calls)


logger.setLevel('INFO')
await go()
La imagen final debería verse algo así.
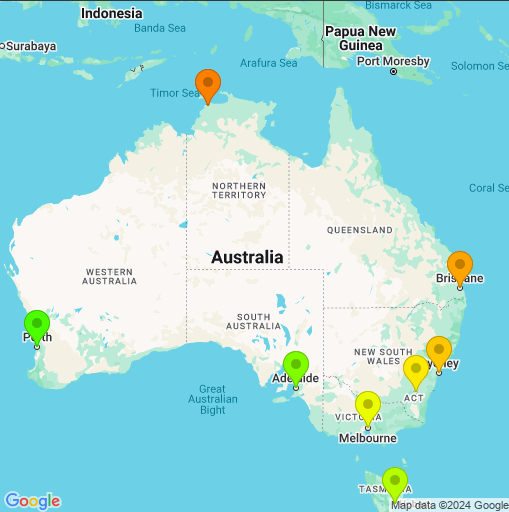
El rendimiento en este ejemplo depende de tu retroalimentación para obtener la salida perfecta. Este ejemplo mostró los primeros 2 pasos de una conversación hipotética, pero podrías seguir iterando con el modelo hasta que los resultados sean los que necesitas.
Próximos pasos
Esta guía muestra un uso más intermedio de la API multimodal en vivo a través de Websockets.
- Para probar la transmisión multimodal, usa la API en vivo en Google AI Studio, no se requiere código.
- Consulta el inicio rápido de la API en vivo usando el SDK de Python o usando websockets.
- Prueba otros ejemplos de grounding.
- Prueba el tutorial de uso de herramientas en la API en vivo para un recorrido por las capacidades de uso de herramientas en vivo de Gemini.
O simplemente consulta las otras capacidades de Gemini ilustradas en los ejemplos del Cookbook.