Introducción a la generación de imágenes con Gemini
Copyright 2026 Google LLC.
# @title Licensed under the Apache License, Version 2.0 (the "License");
# you may not use this file except in compliance with the License.
# You may obtain a copy of the License at
#
# https://www.apache.org/licenses/LICENSE-2.0
#
# Unless required by applicable law or agreed to in writing, software
# distributed under the License is distributed on an "AS IS" BASIS,
# WITHOUT WARRANTIES OR CONDITIONS OF ANY KIND, either express or implied.
# See the License for the specific language governing permissions and
# limitations under the License.
🍌Modelos Gemini 3: Si solo te interesan los nuevos modelos Nano-Banana Pro o Nano-Banana 2, ve directamente a la sección dedicada.
Este notebook te mostrará cómo usar la función nativa de salida de imágenes de Gemini, utilizando las capacidades multimodales del modelo para generar tanto imágenes como textos, e iterar sobre una imagen a través de una discusión.
Ahora hay 3 modelos que puedes usar:
gemini-2.5-flash-imagetambién conocido como "nano-banana": Barato y rápido, pero potente. Esta debería ser tu elección predeterminada.gemini-3-pro-imagetambién conocido como "nano-banana-pro": Más potente gracias a sus capacidades de pensamiento y su acceso a datos del mundo real usando Google Search. Realmente destaca en la creación de diagramas e imágenes fundamentadas. Y para rematar, ¡puede crear imágenes de 2K y 4K!gemini-3.1-flash-imagetambién conocido como "nano-banana-2": El mejor equilibrio entre velocidad y calidad, con nuevas capacidades como Search Grounding, Thinking y una nueva resolución de 512p.
Estos modelos son realmente buenos para:
- Mantener la consistencia del personaje: Preservar la apariencia de un sujeto en múltiples imágenes y escenas generadas.
- Realizar edición inteligente: Habilitar ediciones precisas basadas en prompts, como inpainting (añadir/cambiar objetos), outpainting y transformaciones dirigidas dentro de una imagen.
- Componer y fusionar imágenes: Combinar inteligentemente elementos de múltiples imágenes en una única composición fotorrealista (máximo 3 con flash, 14 con pro).
- Aprovechar el razonamiento multimodal: Construir funciones que comprendan el contexto visual, como seguir instrucciones complejas en un diagrama dibujado a mano.
Siguiendo esta guía, aprenderás a hacer todas esas cosas y aún más.
Nota: Habilita la facturación para usar la generación de imágenes. Esta es una función de pago por uso (consulta precios).
Ten en cuenta que los modelos Imagen también ofrecen generación de imágenes, pero de una manera ligeramente diferente, ya que la función de salida de imágenes se ha desarrollado para funcionar de forma iterativa. Así que, si quieres asegurarte de que ciertos detalles se sigan claramente y estás listo para iterar sobre la imagen hasta que sea exactamente lo que imaginas, la salida de imágenes es para ti.
Consulta la documentación para obtener más detalles sobre ambas funciones y algunos consejos adicionales sobre cuándo usar cada una.
Configuración
Instalar SDK
%pip install -U -q "google-genai>=2.9.0" # minimum version needed for the nano-banana 2 support[2K [90m━━━━━━━━━━━━━━━━━━━━━━━━━━━━━━━━━━━━━━━━[0m [32m52.7/52.7 kB[0m [31m1.8 MB/s[0m eta [36m0:00:00[0m
[2K [90m━━━━━━━━━━━━━━━━━━━━━━━━━━━━━━━━━━━━━━━━[0m [32m822.5/822.5 kB[0m [31m14.7 MB/s[0m eta [36m0:00:00[0m
[2K [90m━━━━━━━━━━━━━━━━━━━━━━━━━━━━━━━━━━━━━━━━[0m [32m246.1/246.1 kB[0m [31m5.4 MB/s[0m eta [36m0:00:00[0m
[?25h[31mERROR: pip's dependency resolver does not currently take into account all the packages that are installed. This behaviour is the source of the following dependency conflicts.
google-colab 1.0.0 requires google-auth==2.47.0, but you have google-auth 2.53.0 which is incompatible.
google-adk 1.29.0 requires google-genai<2.0.0,>=1.64.0, but you have google-genai 2.7.0 which is incompatible.[0m[31m
[0mConfigurar tu clave de API
Para ejecutar la siguiente celda, tu clave de API debe estar almacenada en un Secreto de Colab llamado GEMINI_API_KEY. Si aún no tienes una clave de API, o no estás seguro de cómo crear un Secreto de Colab, consulta Autenticación  para ver un tutorial.
from google.colab import userdata

GEMINI_API_KEY = userdata.get('GEMINI_API_KEY')
Inicializar cliente SDK
Con el nuevo SDK, ahora solo necesitas inicializar un cliente con tu clave de API (o OAuth si usas Vertex AI). El modelo ahora se configura en cada llamada.
from google import genai
from google.genai import types

client = genai.Client(api_key=GEMINI_API_KEY)
Seleccionar un modelo
Puedes elegir entre tres modelos:
gemini-2.5-flash-imagetambién conocido como "nano-banana": Barato y rápido, pero potente. Esta debería ser tu elección predeterminada.gemini-3-pro-imagetambién conocido como "nano-banana-pro": Tiene capacidades de pensamiento y fundamentación con Google Search, e incluso puede generar imágenes de 2K y 4K (consulta la sección dedicada).gemini-3.1-flash-imagetambién conocido como "nano-banana-2": El último modelo Flash con soporte para Search Grounding, Thinking y resolución de 512p.
MODEL_ID = "gemini-3.1-flash-lite-image" # @param ["gemini-3-pro-image", "gemini-3.1-flash-image", "gemini-3.1-flash-lite-image", "gemini-2.5-flash-image"] {"allow-input":true, isTemplate: true}Utilidades
Estas dos funciones te ayudarán a gestionar las salidas del modelo.
En comparación con la generación simple de texto, esta vez la salida contendrá múltiples partes, algunas de ellas texto y otras imágenes. También tendrás que tener en cuenta que podría haber varias imágenes, por lo que no puedes detenerte en la primera.
from IPython.display import display, Markdown, HTML
import pathlib

# Loop over all parts and display them either as text or images
def display_response(interaction):
    for step in interaction.steps:
        if step.type == "model_output":
            for content in step.content:
                if hasattr(content, 'thought') and content.thought:
                    continue  # Skip thoughts
                if content.text:
                    display(Markdown(content.text))
                elif image := content.as_image():
                    image.show()
Generar imágenes
Usar el modelo de generación de imágenes de Gemini es lo mismo que usar cualquier modelo de Gemini: simplemente llamas a generate_content.
Puedes configurar el response_modalities para indicar al modelo que esperas texto e imágenes en la salida, pero es opcional ya que esto se espera con este modelo.
Si solo quieres una imagen y no necesitas texto, puedes configurar response_modalities=['Image'].
prompt = 'Create a photorealistic image of a siamese cat with a green left eye and a blue right one and red patches on his face and a black and pink nose' # @param {type:"string"}

interaction = client.interactions.create(
    model=MODEL_ID,
    input=prompt,
    config=types.GenerateContentConfig(
        response_modalities=['Text', 'Image'] # response_modalities=['Image'] if you only want the images
    )
)

display_response(interaction)
save_image(interaction, 'cat.png')
<IPython.core.display.Markdown object><IPython.core.display.Image object>Editar imágenes
También puedes editar imágenes, simplemente pasa la imagen original como parte del prompt. No te limites a ediciones simples, Gemini es capaz de mantener la consistencia del personaje y representar a tu personaje en diferentes comportamientos o lugares.
import PIL

text_prompt = "Create a side view picture of that cat, in a tropical forest, eating a nano-banana, under the stars" # @param {type:"string"}

interaction = client.interactions.create(
    model=MODEL_ID,
    input=[
        text_prompt,
        PIL.Image.open('cat.png')
    ]
)

display_response(interaction)
save_image(interaction, 'cat_tropical.png')
<IPython.core.display.Image object>Como puedes ver, puedes reconocer claramente al mismo gato con su peculiar nariz y ojos.
Controlar la relación de aspecto
Puedes controlar la relación de aspecto de la imagen de salida. El comportamiento principal del modelo es igualar el tamaño de tus imágenes de entrada; de lo contrario, por defecto genera imágenes cuadradas (1:1).
Para hacerlo, añade un valor aspect_ratio al image_config como puedes ver en la celda de abajo. Las diferentes relaciones disponibles y el tamaño de la imagen generada se enumeran en esta tabla:
| Relación de aspecto | Resolución (1k) |
|---|---|
| 1:1 | 1024x1024 |
| 2:3 | 832x1248 |
| 3:2 | 1248x832 |
| 3:4 | 864x1184 |
| 4:3 | 1184x864 |
| 4:5 | 896x1152 |
| 5:4 | 1152x896 |
| 9:16 | 768x1344 |
| 16:9 | 1344x768 |
| 21:9 | 1536x672 |
| 1:4 (NB2) | 121x488 |
| 1:8 (NB2) | 103x864 |
| 4:1 (NB2) | 488x121 |
| 8:1 (NB2) | 864x103 |
Ten en cuenta que el número de tokens permanece igual para todas las relaciones de aspecto y solo depende del modelo y la resolución.
import PIL

text_prompt = "Now the cat should keep the same attitude, but be well dressed in fancy restaurant and eat a fancy nano banana." # @param {type:"string"}
aspect_ratio = "16:9" # @param ["1:1","1:4","1:8","2:3","3:2","3:4","4:1","4:3","4:5","5:4","8:1","9:16","16:9","21:9"]

interaction = client.interactions.create(
    model=MODEL_ID,
    input=[
        text_prompt,
        PIL.Image.open('cat_tropical.png')
    ],
    config=types.GenerateContentConfig(
        response_modalities=["IMAGE"],
        image_config=types.ImageConfig(
            aspect_ratio=aspect_ratio,
        )
    )

)

display_response(interaction)
save_image(interaction, 'cat_resaurant.png')
<PIL.PngImagePlugin.PngImageFile image mode=RGB size=1344x768>Obtener varias imágenes (ej: contar historias)
Hasta ahora solo has generado una imagen por llamada, ¡pero puedes solicitar muchas más! Intentemos una receta de repostería o contar una historia.
prompt = "Show me how to bake macarons with images" # @param ["Show me how to bake macarons with images","Create a beautifully entertaining 8 part story with 8 images with two blue characters and their adventures in the 1960s music scene. The story is thrilling throughout with emotional highs and lows and ending on a great twist and high note. Do not include any words or text on the images but tell the story purely through the imagery itself. "] {"allow-input":true}

interaction = client.interactions.create(
    model=MODEL_ID,
    input=prompt,
)

display_response(interaction)

# Be careful; long output (see below)
La salida de la celda de código anterior no pudo guardarse en el notebook sin hacerlo demasiado grande para ser gestionado por Github, pero aquí tienes algunos ejemplos de cómo debería verse cuando lo ejecutas al pedir una historia o una receta de repostería:
Prompt: Crea una historia bellamente entretenida de 8 partes con 8 imágenes con dos personajes azules y sus aventuras en la escena musical de los años 60. La historia es emocionante de principio a fin con altibajos emocionales y termina con un gran giro y una nota alta. No incluyas palabras ni texto en las imágenes, sino cuenta la historia puramente a través de las imágenes.
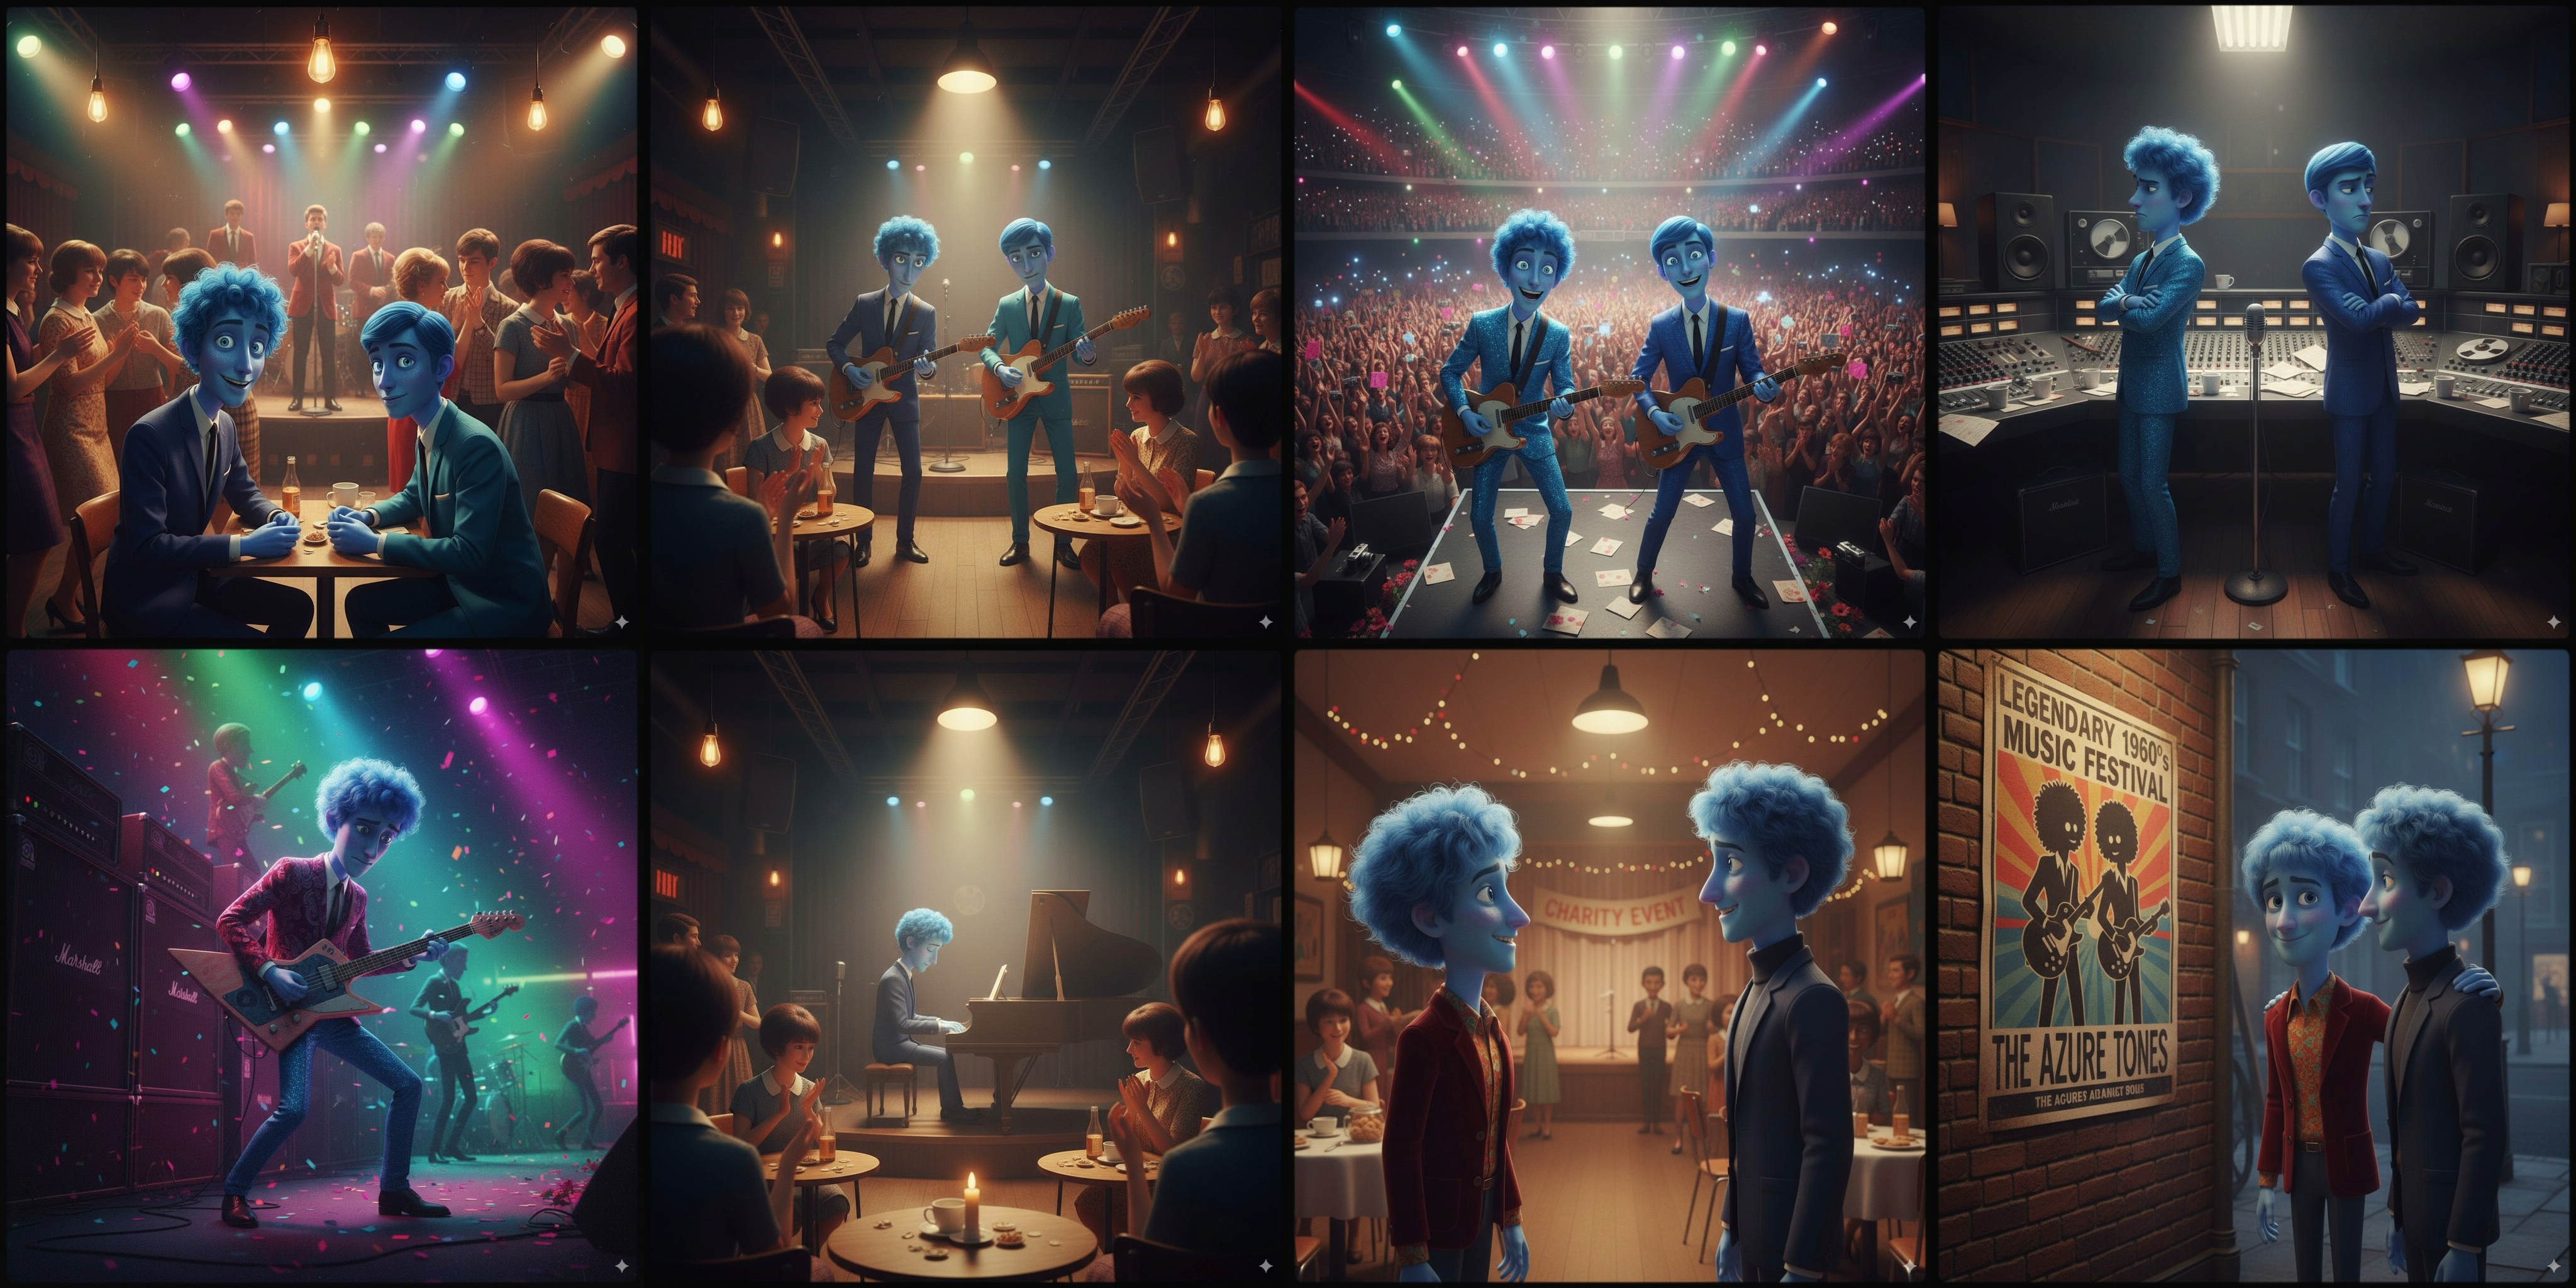 (Las imágenes se han unido)
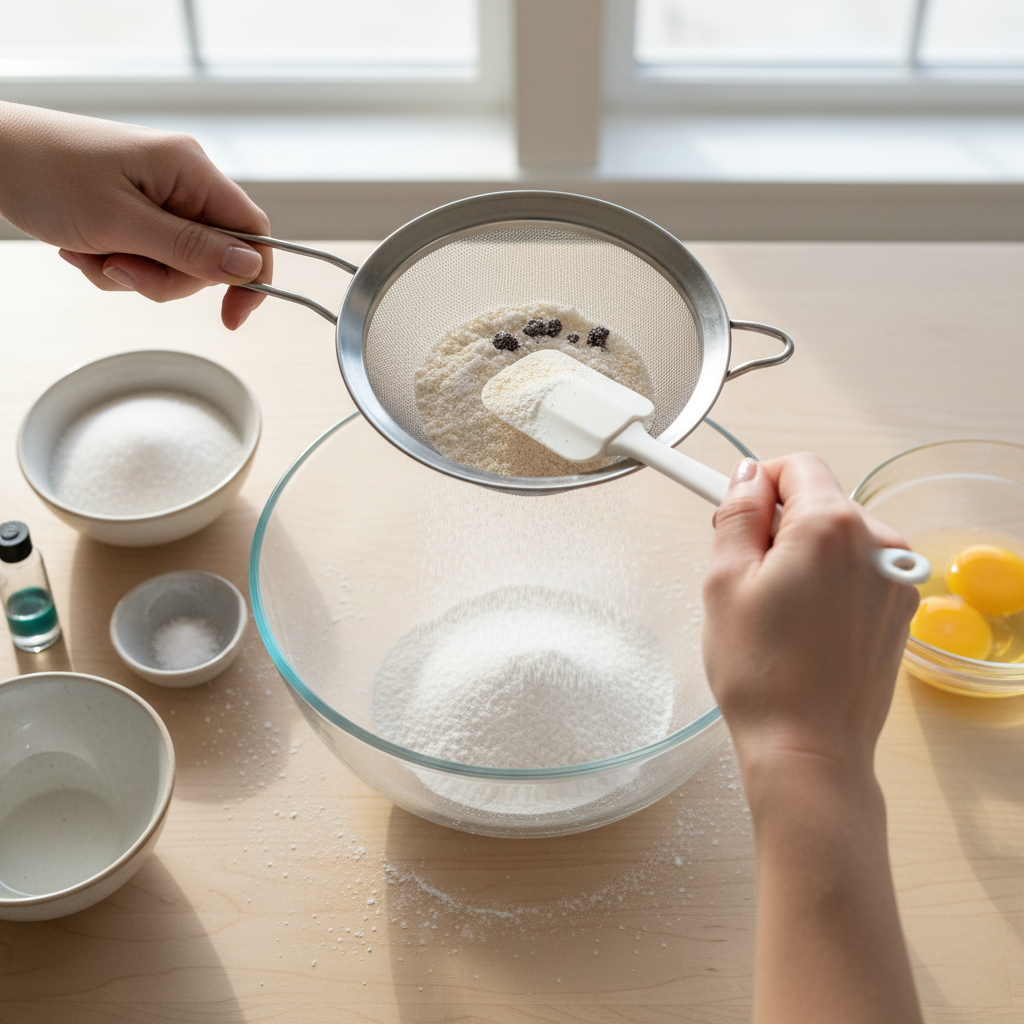
Prompt: Muéstrame cómo hornear macarons con imágenes
¡Eso suena delicioso! Aquí tienes una guía simplificada sobre cómo hornear macarons. Aunque puede ser un poco complicado, ¡la práctica hace al maestro!
Ingredientes que necesitarás:
Para las cáscaras de macaron:
- 100g de harina de almendras
- 100g de azúcar glas
- 75g de azúcar granulada
- 2 claras de huevo (envejecidas uno o dos días a temperatura ambiente, si es posible, para mayor estabilidad)
- Una pizca de sal (opcional)
- Colorante alimentario (en gel o en polvo, no líquido)
Para el relleno: (La crema de mantequilla, la ganache o la mermelada son opciones populares)
Paso 1: Prepara tus ingredientes secos. Tamiza la harina de almendras y el azúcar glas en un bol. Este paso es crucial para conseguir unas cáscaras de macaron suaves, ya que elimina cualquier grumo.
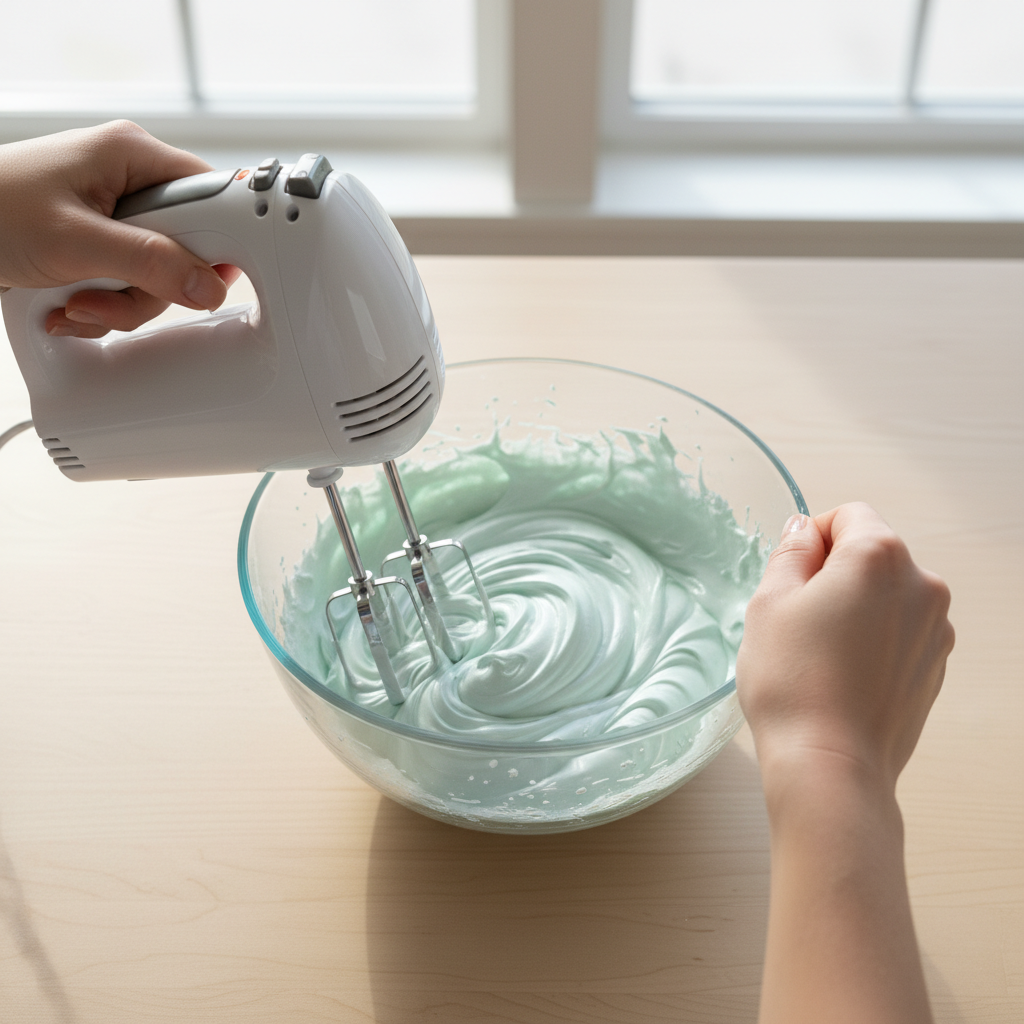
Paso 2: Haz el merengue. En un bol limpio y aparte, bate las claras de huevo con una pizca de sal (si la usas) hasta que estén espumosas. Añade gradualmente el azúcar granulada, continuando batiendo hasta conseguir picos firmes y brillantes. Si usas colorante alimentario, añádelo ahora. El merengue debe ser lo suficientemente firme como para que puedas voltear el bol sin que se caiga.
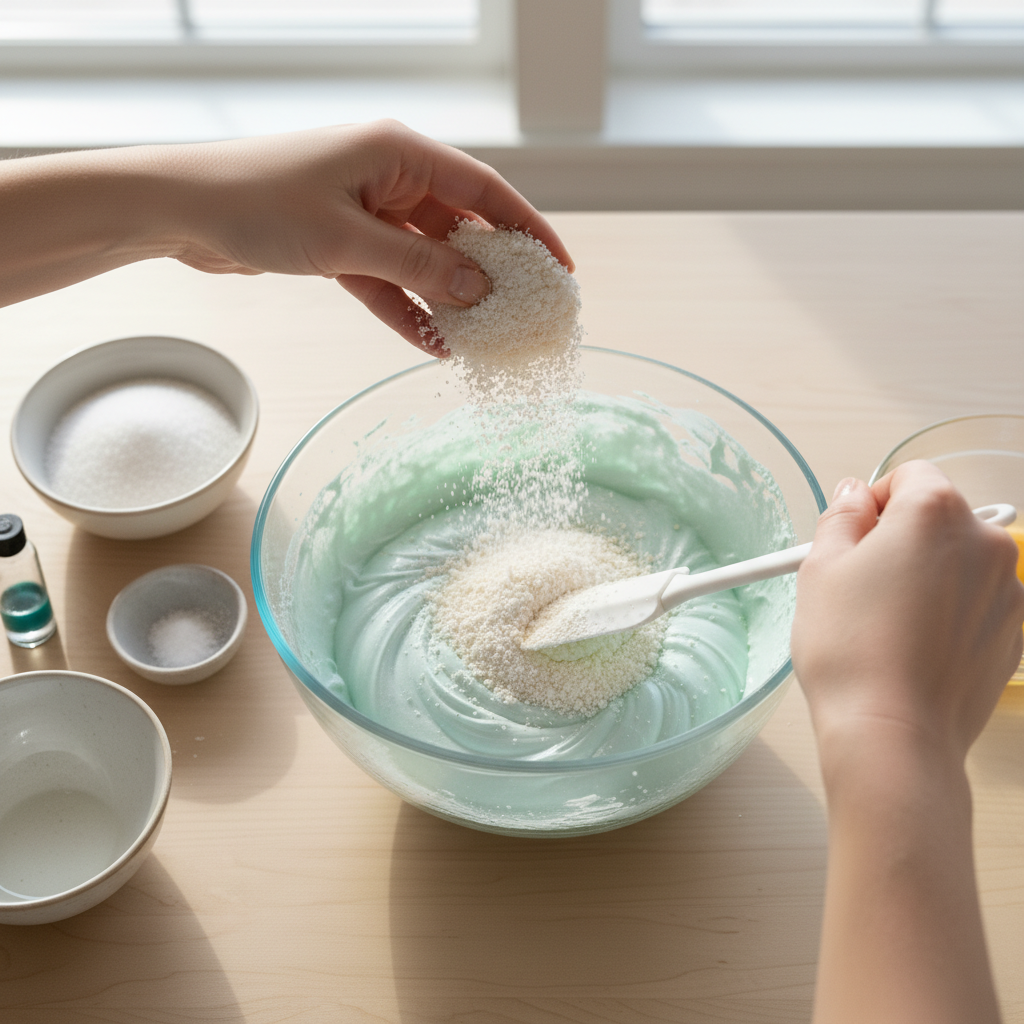
Paso 3: Combina los ingredientes secos con el merengue (Macaronage). Incorpora suavemente la harina de almendras tamizada y el azúcar glas al merengue en dos o tres adiciones. Esto se llama "macaronage" y es el paso más crítico. Debes mezclar hasta que la masa fluya como "lava" o tenga una consistencia de cinta lenta cuando levantes la espátula. Ten cuidado de no mezclar en exceso, o tus macarons quedarán planos; una mezcla insuficiente resultará en cáscaras grumosas.
Paso 4: Forma los macarons. Transfiere la masa a una manga pastelera con una boquilla redonda. Forma círculos uniformes sobre bandejas de horno forradas con papel de horno o tapetes de silicona. Deja algo de espacio entre cada macaron.
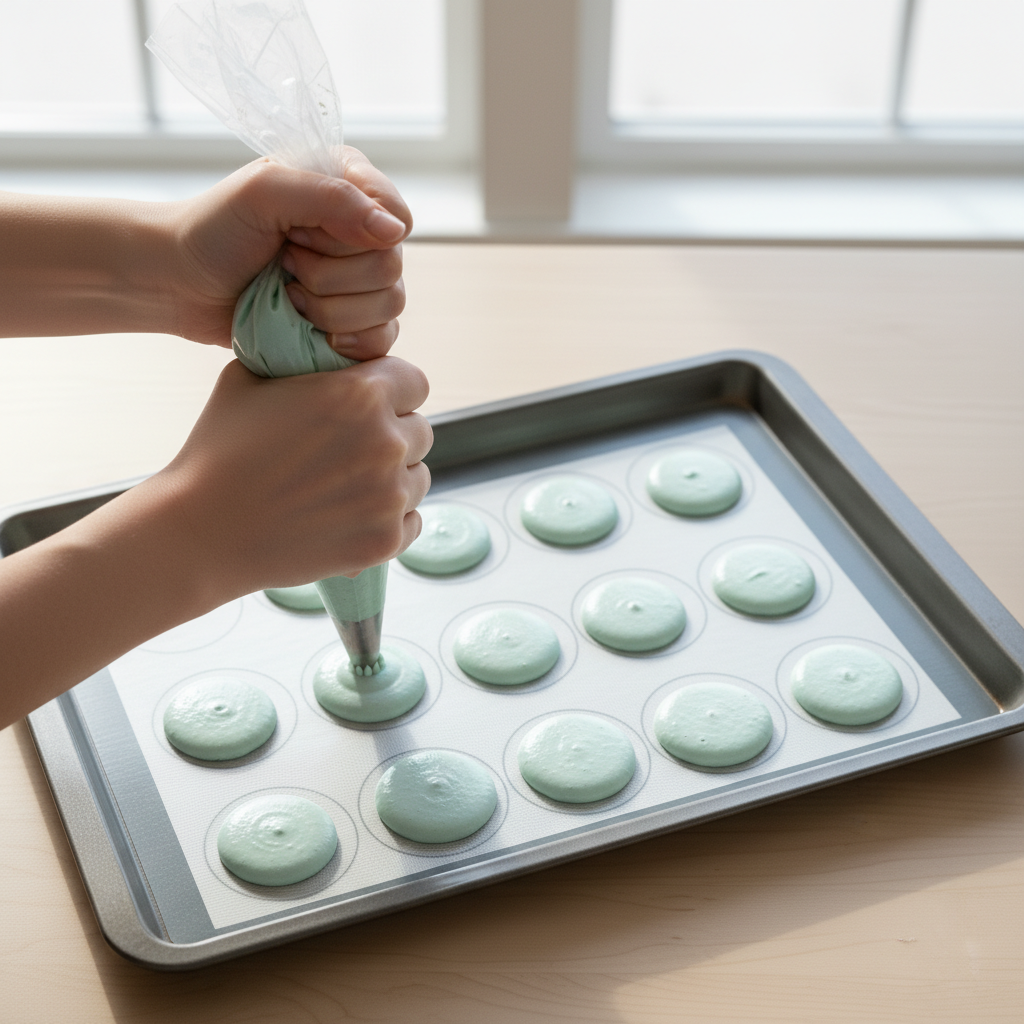
Paso 5: Golpea y reposa. Golpea firmemente las bandejas de horno sobre tu encimera varias veces para liberar cualquier burbuja de aire. Usa un palillo para reventar las burbujas restantes. Esto ayuda a crear superficies lisas y los característicos "pies". Deja reposar los macarons formados a temperatura ambiente durante 30-60 minutos, o hasta que se forme una piel en la parte superior. Cuando toques suavemente una cáscara, no debe sentirse pegajosa. Este paso de "secado" es esencial para que los pies se desarrollen correctamente.
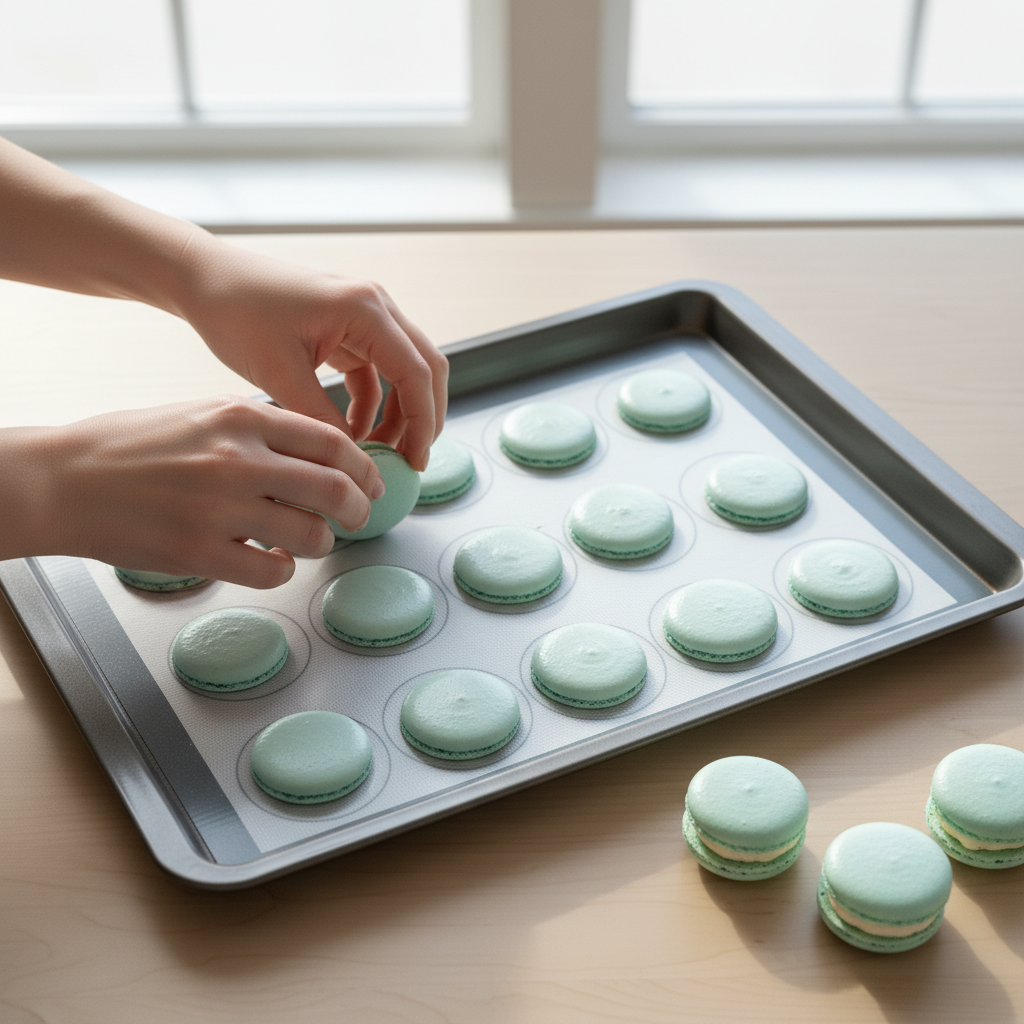
Paso 6: Hornea los macarons. Precalienta tu horno a 150°C (300°F). Hornea una bandeja a la vez durante 12-15 minutos. El tiempo exacto puede variar según el horno. Estarán listos cuando hayan desarrollado "pies" y no se tambaleen al tocarlos suavemente.
Paso 7: Enfría y rellena. Una vez horneados, deja que las cáscaras de macaron se enfríen completamente en la bandeja de horno antes de despegarlas con cuidado. Esto evita que se rompan. Luego, únelas por tamaño y aplica o extiende el relleno elegido sobre una cáscara antes de hacer un sándwich con otra.
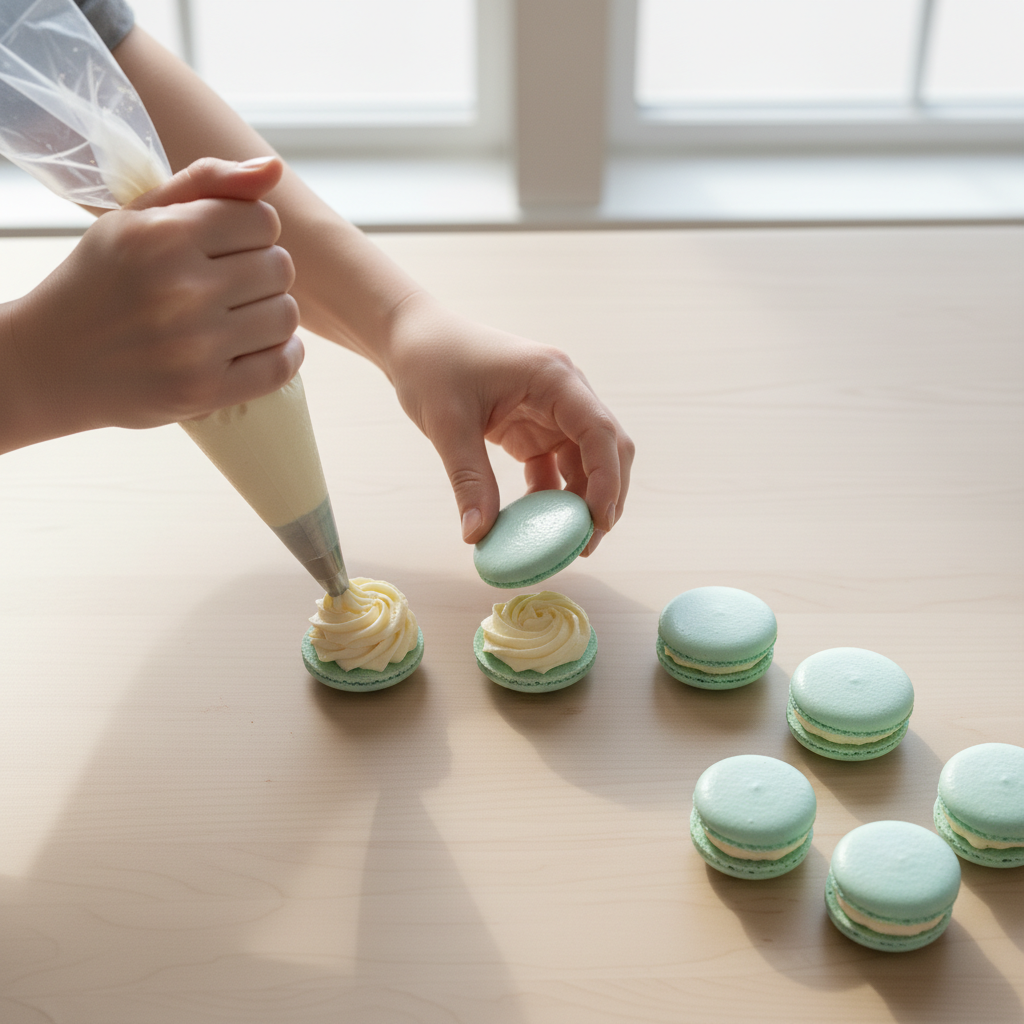
Finalmente, déjalos madurar en el refrigerador durante al menos 24 horas. Esto permite que los sabores se mezclen y las cáscaras se ablanden hasta alcanzar la consistencia masticable perfecta.
¡Disfruta de tus macarons caseros!
Modo chat (método recomendado)
Hasta ahora has usado llamadas unarias, pero la salida de imágenes está hecha para funcionar mejor con el modo chat, ya que es más fácil iterar sobre una imagen turno tras turno.
chat = client.chats.create(
    model=MODEL_ID,
)
message = "create a image of a plastic toy fox figurine in a kid's bedroom, it can have accessories but no weapon" # @param {type:"string"}
response = chat.send_message(message)
display_response(response)
save_image(response, "figurine.png")<IPython.core.display.Markdown object><IPython.core.display.Image object>message = "Add a blue planet on the figuring's helmet or hat (add one if needed)" # @param {type:"string"}
response = chat.send_message(message)
display_response(response)<IPython.core.display.Image object>message = 'Move that figurine on a beach' # @param {type:"string"}
response = chat.send_message(message)
display_response(response)<IPython.core.display.Image object>message = 'Now it should be base-jumping from a spaceship with a wingsuit' # @param {type:"string"}
response = chat.send_message(message)
display_response(response)<IPython.core.display.Image object>message = 'Cooking a barbecue with an apron' # @param {type:"string"}
response = chat.send_message(message)
display_response(response)<IPython.core.display.Image object>message = 'What about chilling in a spa?' # @param {type:"string"}
response = chat.send_message(message)
display_response(response)<IPython.core.display.Image object>También puedes controlar la relación de aspecto de la imagen de salida en el modo chat.
Para hacerlo, añade un valor aspect_ratio al image_config como puedes ver en la celda de abajo.
message = "Bring it back to the bedroom" # @param {type:"string"}
response = chat.send_message(
    message,
    config=types.GenerateContentConfig(
        image_config=types.ImageConfig(aspect_ratio="16:9"),
    ),
)
display_response(response)
<PIL.PngImagePlugin.PngImageFile image mode=RGB size=1344x768>Mezclar varias imágenes
También puedes mezclar varias imágenes (hasta 3 con nano-banana, 14 con nano-banana-pro, 6 con alta fidelidad), ya sea porque hay varios personajes en tu imagen, o porque quieres resaltar un determinado producto, o establecer el fondo.
import PIL

text_prompt = "Create a picture of that figurine riding that cat in a fantasy world." # @param {type:"string"}

interaction = client.interactions.create(
    model=MODEL_ID,
    input=[
        text_prompt,
        PIL.Image.open('cat.png'),
        PIL.Image.open('figurine.png')
    ],
)

display_response(interaction)
<IPython.core.display.Markdown object><IPython.core.display.Image object>Modelos Gemini 3 (Nano-Banana Pro y 2)
Reflejando su origen compartido de los modelos Gemini 3, tanto Nano-Banana Pro como Nano-Banana 2 ofrecen capacidades avanzadas más allá del modelo Flash estándar.
Ambos soportan el pensamiento, lo que les permite procesar solicitudes complejas de manera más efectiva. Además, pueden usar Search Grounding para acceder a información actualizada y proporcionar respuestas más precisas.
Nano-Banana Pro realmente destaca en la creación de diagramas e incluso puede generar imágenes de 2K y 4K (consulta la sección dedicada).
Nano-Banana 2 proporciona un gran equilibrio entre velocidad y calidad, introduce un modo de resolución de 512p de baja latencia y es capaz de fundamentar aún mejor sus solicitudes utilizando la búsqueda de Google.
# @title Run this cell to set everything up (especially if you jumped directly to this section)

from google.colab import userdata
from google import genai
from google.genai import types
from IPython.display import display, Markdown, HTML
import PIL

client = genai.Client(api_key=userdata.get('GEMINI_API_KEY'))

# Loop over all parts and display them either as text or images
def display_response(response):
  for part in response.parts:
    if part.thought: # We don't want to see the thoughts
      continue
    if part.text:
      display(Markdown(part.text))
    elif image:= part.as_image():
      image.show()

# Save the image
# If there are multiple ones, only the last one will be saved
def save_image(response, path):
  for part in response.parts:
    if image:= part.as_image():
      image.save(path)
# Let's switch to the 3.1 model
GEMINI3_MODEL_ID = "gemini-3.1-flash-image" # @param ["gemini-3-pro-image", "gemini-3.1-flash-image"] {"allow-input":true, isTemplate: true}Verificar los pensamientos (Nano-Banana Pro y Nano-Banana 2)
Los modelos Gemini 3 pueden "pensar" antes de responder. Esto es particularmente útil para tareas de razonamiento complejas.
Nano-Banana 2 también introduce los Niveles de Pensamiento, lo que te permite controlar la profundidad del razonamiento (disponible a través del thinking_config en tu solicitud) como los modelos de código Gemini 3.
Ten en cuenta que pagas por los tokens de pensamiento (pero no por las imágenes que contienen) como tokens de salida (consulta los precios).
prompt = "Create an unusual but realistic image that might go viral"  # @param {type:"string"}
aspect_ratio = "16:9" # @param ["1:1","1:4","1:8","2:3","3:2","3:4","4:1","4:3","4:5","5:4","8:1","9:16","16:9","21:9"]
thinking_level = "High" # @param ["Minimal", "High"] # Only for Nano-Banana 2

interaction = client.interactions.create(
    model=GEMINI3_MODEL_ID,
    input=prompt,
    config=types.GenerateContentConfig(
        response_modalities=['Text', 'Image'],
        image_config=types.ImageConfig(
            aspect_ratio=aspect_ratio,
        ),
        thinking_config=types.ThinkingConfig(
            thinking_level=thinking_level,
            include_thoughts=True # Don't forget this part if you want to check the thoughts later
        )
    )
)

display_response(interaction)
save_image(interaction, 'viral.png')
<PIL.JpegImagePlugin.JpegImageFile image mode=RGB size=1376x768>Dado que Nano-banana Pro es un modelo de pensamiento, puedes verificar los pensamientos que llevaron a la producción de la imagen.
for part in response.parts:
  if part.thought:
    if part.text:
      display(Markdown(part.text))
    elif image:= part.as_image():
      #image.show() # Skipping it since in most case it should be the same image as in the output
      print("IMAGE")
<IPython.core.display.Markdown object>IMAGE<IPython.core.display.Markdown object>Firmas de pensamientos
La parte de salida de los modelos Gemini 3 siempre contiene though_signatures.
Si estás usando el SDK, ya que está completamente gestionado por los SDKs. Pero si tienes curiosidad, esto es lo que sucede detrás de escena.
# Loop over all parts and display the thought signature:
for part in response.parts:
  if part.thought_signature:
    print(part.thought_signature)
b'\x12\xcc\x92s\n\xc8\x92s\x01\xd1\xed\x8ao\xf8>\xaf\xbc\x9d\x8a\xe2\x15W\xfd\xd7\xf1\xf9C\xe66jaD\xdc\x06\xf59{\xb8g\x8e\x8c\xdd\xf4\xb1\x18N\xe4\xed0\xb0\xcc\xd6? 8\x98\x9e\x0f\x89\xf4\x13\x87\x1a\xc5\xa9\xfb\x04F\xb57\'\xbb\xea\xfc\xe8\xd4y6\x84\xf9\xd5\xc5\x08\xa5E:\xb8)\x80\x165\x1a\xccs\xb1\xfb\xef*\xbf\xdd;\xcb;v\xcc\x11\xf5\xab(I\xe4k\xbc" `\x9e\x06I\xc2\x9ezHZ\x8c\x9a\xf1y7\x93\x88\xa5\xa2\xac\xbf\xb9jpd\x16\xb6%A\xca\xbc\xbb\xa0/\x06^\xba\xc6\x83k,\x1d\xf6o\x8fG|\x1b<\xea:\xb0Dt\xc7n\x94/7\xe1\x04a,\x1d\x17\x99\x9be\x18\x87$r\xef\xd2~\x83{\x0f\x1b1#\xc9\xcc\xa6\xfdmBID\xe0\x91\xce\xcd\xde\xc2tv\x98\xbe\xca{\x81Q^A\x9c\'\xc3WH\x14\x1c\xa37^s\x03\x8e\x9d\x9b\x1a\xfe\x0f`\xf2\xb5 \xd7\xd5\xa3\xca\x84\x15\x9b\tx*\xddG\xddB\x8a\x14e\x90\x82\x87\x05V\xc5\xaf\x8f\x13\xb8\xbb\xb6\xed5D)jK\xda\xfc0\x82\x05+\xd7\xceW\xe6\xb6\xff\x8a:*?\xfb\xe1\xf56`X*\xfa\x8c*\xeb\x11\xc0>?\xbd%\x98\r\x10I!@\xfa\x91>\x03\xed\xe0#\n(\xf0\\\xc9\xe6\x84$\xdf\xfeS,\t\xee\x03\x97/\x1fE\xf5\xa8\xbb\xec\xcdD\x87\xb26\x88n\x81c\xceT\xe9{\x8af\xdf>\x80\xa9M\xad\x17Zk!Pb\x0fR\x81\xbcV\xf5xxVpT\x80d\xa1e\xf4=\x83\xa17\xe3\x87\xbf\x1e\xfej\xd9.JP\xf6#\xc7\xaf\xcf\x82\x1e\x9a\xbd\xe4\xb3\xf1[*t!}\xdf\x04\x9fN\x04\x14\x0e\n\xd7KQ\x17\xf0\xb5R\x8a&\xd9\xeeV\xd9\x1c\xd2f\xb0U[Ke]\x11\xe47\xbc?\x16b\xe3\x8a\x9fK\xa5K\x84\xa9d\x07\xcf\xb4]/\xff,\\_\xac[\x91O\xf5Y\xb4\x1f\xd2\x1f\x85\x1byw\x8c\x00\xc5\x85\x05\x9c\xf7R\xd6\xd9\x02\xe1F\xdbx\xb9r 3\x92\x82\xa2\xb2\xbe\x89\xa5"\xc5\xec\x84\xb7\xdb\x07\xde`\xfb\x9e\xb9_\x82p^\xbbQRg\xb2\x92EE\x16\xa1\xf7\xe3\x8e\t3\xb07i\xd7`\x9avQ<\x8eA=\xac\x0f\xcfU$\x95v*(S\xe1\x95QOF\xdc\x92<\xa5\xc43;\xda\xb6\xb7B\xc8\xf6\xb3r\x03\xb5\x94q\x1b0\x7f\xd0\r\n\x02\xc9\xe2\x9c\xae\xdd\xaa\xbc\xa9\xa9\xadL\x1b\x89i\x9a\x91\x0cm\x91F\tEW\x172\x14\x0c\xbd}\x0f\xf4\\!R\x84\xac(:Rl\x86\x9fy\xf8\x83\xc9n\x8a\x9b\xa8\x1fJ|q\x90i{\xdf\x1b\xf5\n*\xa1\x11\xdb\xc7_\x03\xc1\x9e\xf0\xca\x95\x1d\xd3\x11i\xd0\x8e\x85\xa1\xa6\xb7\xd9\xc9\xbd\xbe\xa3\xac\x98\xa8{\x11t>\x12\x04q2U\x98\xf8f{\xda\xde\'\x01\xcd\xfb7\x86\x19\x82IB\x9f&\x9c\xb4\xbd\x96J\x1c\xb6q\xdd~3\x13\xbej|W`\x82\xedw\x873g\x8e\xc6&\xdd\x88\xa9-\x06\x0e\x0c/\x19\xc4N\xc8U\x99Z\x12@\xd5\\e\x85\xa4\x191\x17\xbaI\xb6\xa1\x16\xaa\x1c\xb9WfCD\xa2W\xb7/\x01\xd5q\xd0B\x12\x03\x8e\x9fGL+\x15\x7f\x9a\xbe\xceu\xaf\x1cs\x85t=\x1d1#w\xad\xc0\xcf\xd6\\]\x1d\xb9\xe6\x07\xe9\xa1-\xc50\x17RG\xcd\xf8I}/\x0fX\x82\xcaq\xa2\xa2\xe6\x14\x0f\x1d\xd9C\xeb\xbf\x1d\xb4,\xf6c\x19\x8b!\x18\xa8\xbb\xc8Q\x96\x12\xad\x16\x15\x13\xd5|\xfe\x86R\n\x0b}\xde\xe4\x89tc\xeeB\xbb\xfe\' \xc9\xd5\x86H\xfe7\x1b\xa9\xac\xbe\xf8\xea9[I[d?\xffk\xc7f\x03s\x10*v\xc0T\\\x8a\xect\xd40\x97l\x96\xf0\x15\xf3\xa3 \xf9\x1c\xd6\xb7\x97\xff\x89\xfc7p\xccO\xedQ\x84|!\x99\x08}\xaf\xd3\xd2L\xd4\x949P\xa8Z)\xafF\xf5=\x0c[Q\x81\xa5\x18,e\\\x16Gl}@;\xd5\xb1NB\xad\xb7V\xa4uO#\nuC\xbc\xeeU\xd2\xad(\x08#\xb6~\x90/\x9b\xc6W\x14\x1f\x8as\x9b\xbci\x8b\x14@\xc8\x1c\xc3o\x7f\xb3O\x87=\xeb\x8f\xcaJ\x8b\x1b\xb2d\xf6\xaa|\x
… (salida recortada)
Esta firma es utilizada por el modelo cuando quieres tener discusiones en modo chat/multi-turno. Ayuda al modelo no solo a recordar lo que se dijo antes, sino también lo que pensó antes o lo que obtuvo de sus herramientas y llamadas a funciones.
Aquí tienes un ejemplo: imagina que le pides al modelo la temperatura de hoy (como en el siguiente ejemplo). Usará la búsqueda de Google para obtener el clima y luego te dirá que será de 25°C. Si luego le pides que añada la humedad a la imagen, gracias a las firmas de pensamiento, podrá recordar que también obtuvo esa información de la primera llamada y no hará una nueva solicitud.
Más detalles en la documentación.
Usar fundamentación de búsqueda (Nano-Banana Pro y Nano-Banana 2)
Ten en cuenta que solo se fundamenta utilizando los resultados de texto y no las imágenes que podrían encontrarse usando Google Search. Solo necesitas añadir tools=[{"google_search": {}}] a tu configuración.
prompt = "Visualize the current weather forecast for the next 5 days in Tokyo as a clean, modern weather chart. add a visual on what i should wear each day"  # @param {type:"string"}
aspect_ratio = "16:9" # @param ["1:1","1:4","1:8","2:3","3:2","3:4","4:1","4:3","4:5","5:4","8:1","9:16","16:9","21:9"]

interaction = client.interactions.create(
    model=GEMINI3_MODEL_ID,
    input=prompt,
    config=types.GenerateContentConfig(
        response_modalities=['Text', 'Image'], # Image only currently doesn't wortk with grounding
        image_config=types.ImageConfig(
            aspect_ratio=aspect_ratio,
        ),
        tools=[{"google_search": {}}]
    )
)

display_response(interaction)
save_image(interaction, 'weather.png')
<PIL.JpegImagePlugin.JpegImageFile image mode=RGB size=1376x768>No olvides mostrar las fuentes:
from IPython.display import display, HTML

# Display grounding sources if available
for step in interaction.steps:
    if step.type == "model_output":
        if hasattr(step, 'grounding_metadata') and step.grounding_metadata:
            if hasattr(step.grounding_metadata, 'search_entry_point'):
                display(HTML(step.grounding_metadata.search_entry_point.rendered_content))
<IPython.core.display.HTML object>Más sobre cómo funciona la fundamentación de búsqueda en la guía dedicada .
Usar fundamentación de imágenes (Nano-Banana 2)
Nano-Banana 2 también es capaz de buscar imágenes en Google Search para fundamentar aún mejor sus generaciones. Esto es especialmente útil cuando se buscan lugares o puntos de referencia del mundo real, especies animales específicas...
Si solo proporcionas la herramienta google_search sin ningún parámetro como en el ejemplo anterior, solo buscará fundamentación de texto. Si también quieres que busque imágenes, debes especificar su search_types y decirle que busque imágenes añadiendo image_search=types.ImageSearch(). Puedes indicarle que busque ambas, como en el ejemplo siguiente, añadiendo también web_search=types.WebSearch(). El precio es el mismo tanto si pides una como si pides ambas.
Ten en cuenta que no puedes buscar imágenes de personas.
PROMPT = "A detailed painting of a Timareta Thelxione butterfly resting on a flower" # @param {type:"string"}

interaction = client.interactions.create(
    model=GEMINI3_MODEL_ID,
    input=PROMPT,
    config=types.GenerateContentConfig(
        response_modalities=["IMAGE"],
        tools=[
            types.Tool(google_search=types.GoogleSearch(
                search_types=types.SearchTypes(
                    web_search=types.WebSearch(),
                    image_search=types.ImageSearch() # This adds the image search grounding (exclusive to the Nano-Banana 2 model)
                )
            ))
        ]
    )
)

display_response(interaction)
<PIL.PngImagePlugin.PngImageFile image mode=RGB size=1376x768>Generar imágenes 4K (Nano-Banana Pro y Nano-Banana 2)
Los modelos Gemini 3 pueden generar imágenes de 1K, 2K o 4K. Nano-Banana 2 también puede crear imágenes de 512px.
Las imágenes 4K son más caras, así que úsalas solo cuando sea necesario (consulta los precios).
Aquí están las resoluciones correspondientes para cada relación de aspecto y resolución:
| Relación de aspecto | Resolución 512px | Resolución 1K | Resolución 2K | Resolución 4K |
|---|---|---|---|---|
| 1:1 | 512x512 | 1024x1024 | 2048x2048 | 4096x4096 |
| 2:3 | 424x632 | 848x1264 | 1696x2528 | 3392x5056 |
| 3:2 | 632x424 | 1264x848 | 2528x1696 | 5056x3392 |
| 3:4 | 448x600 | 896x1200 | 1792x2400 | 3584x4800 |
| 4:3 | 600x448 | 1200x896 | 2400x1792 | 4800x3584 |
| 4:5 | 464x576 | 928x1152 | 1856x2304 | 3712x4608 |
| 5:4 | 576x464 | 1152x928 | 2304x1856 | 4608x3712 |
| 9:16 | 384x688 | 768x1376 | 1536x2752 | 3072x5504 |
| 16:9 | 688x384 | 1376x768 | 2752x1536 | 5504x3072 |
| 21:9 | 792x336 | 1584x672 | 3168x1344 | 6336x2688 |
| 1:4 (NB2) | 256x1024 | 512x2048 | 1024x4096 | 2048x8192 |
| 4:1 (NB2) | 1024x256 | 2048x512 | 4096x1024 | 8192x2048 |
| 1:8 (NB2) | 192x1536 | 384x3072 | 768x6144 | 1536x12288 |
| 8:1 (NB2) | 1536x192 | 3072x384 | 6144x768 | 12288x1536 |
Los tokens son independientes de la relación de aspecto y solo dependen del modelo y la resolución. Consulta los precios para más detalles.
prompt = "A photo of an oak tree experiencing every season"  # @param {type:"string"}
aspect_ratio = "1:1" # @param ["1:1","1:4","1:8","2:3","3:2","3:4","4:1","4:3","4:5","5:4","8:1","9:16","16:9","21:9"]
resolution = "4K" # @param ["1K", "2K", "4K"]

interaction = client.interactions.create(
    model=GEMINI3_MODEL_ID,
    input=prompt,
    config=types.GenerateContentConfig(
        response_modalities=['Text', 'Image'],
        image_config=types.ImageConfig(
            aspect_ratio=aspect_ratio,
            image_size=resolution
        )
    )
)

display_response(interaction)
<PIL.JpegImagePlugin.JpegImageFile image mode=RGB size=4096x4096>Resolución de baja latencia 512p (Nano-Banana 2)
Nano-Banana 2 introduce un nuevo modo de resolución de 512p, optimizado para la velocidad y aplicaciones de baja latencia, manteniendo una alta calidad para muchos casos de uso.
Consejo: usa la resolución de 512px junto con la API de lotes para reducir tus costos al mínimo cuando necesites crear muchas imágenes y le pidas a Nano-Banana que mejore las que necesites a resoluciones más altas.
RESOLUTION = "512px" # @param ["512px", "1K", "2K", "4K"]

interaction = client.interactions.create(
    model="gemini-3.1-flash-image",
    input="A cute pixel art robot",
    config=types.GenerateContentConfig(
        response_modalities=["IMAGE"],
        image_config=types.ImageConfig(
            image_size=RESOLUTION
        )
    )
)

display_response(interaction)
<PIL.PngImagePlugin.PngImageFile image mode=RGB size=1408x768>Generar o traducir imágenes (Nano-Banana Pro y Nano-Banana 2)
¡Ahora puedes generar o traducir imágenes en más de una docena de idiomas!
chat = client.chats.create(
    model=GEMINI3_MODEL_ID,
    config=types.GenerateContentConfig(
        response_modalities=['Text', 'Image'],
        tools=[{"google_search": {}}]
    )
)
message = "Make an infographic explaining Einstein's theory of General Relativity suitable for a 6th grader in Spanish" # @param {type:"string"}
aspect_ratio = "16:9" # @param ["1:1","1:4","1:8","2:3","3:2","3:4","4:1","4:3","4:5","5:4","8:1","9:16","16:9","21:9"]
response = chat.send_message(message,
config=types.GenerateContentConfig(
image_config=types.ImageConfig(
aspect_ratio=aspect_ratio,
)
)
)
display_response(response)
save_image(response, "relativity_ES.png")<PIL.JpegImagePlugin.JpegImageFile image mode=RGB size=1376x768>message = "Translate this infographic in Japanese, keeping everything else the same" # @param {type:"string"}
resolution = "2K" # @param ["1K", "2K", "4K"]
response = chat.send_message(message,
config=types.GenerateContentConfig(
image_config=types.ImageConfig(
image_size=resolution
)
)
)
display_response(response)
save_image(response, "relativity_JP.png")<PIL.JpegImagePlugin.JpegImageFile image mode=RGB size=2752x1536>¡Mezcla hasta 14 imágenes! (Nano-Banana Pro y Nano-Banana 2)
Ahora puedes mezclar hasta 6 imágenes en alta fidelidad y 14 con cambios menores. Aquí tienes un ejemplo:
# Get some images
!wget "https://storage.googleapis.com/generativeai-downloads/images/sweets.png" -O "sweets.png" -q
!wget "https://storage.googleapis.com/generativeai-downloads/images/car.png" -O "car.png" -q
!wget "https://storage.googleapis.com/generativeai-downloads/images/rabbit.png" -O "rabbit.png" -q
!wget "https://storage.googleapis.com/generativeai-downloads/images/spartan.png" -O "spartan.png" -q
!wget "https://storage.googleapis.com/generativeai-downloads/images/cactus.png" -O "cactus.png" -q
!wget "https://storage.googleapis.com/generativeai-downloads/images/cards.png" -O "cards.png" -q
prompt = "Create a marketing photoshoot of those items from my daughter's bedroom. Focus on the items and ignore their backgrounds." # @param {type:"string"}
aspect_ratio = "5:4" # @param ["1:1","1:4","1:8","2:3","3:2","3:4","4:1","4:3","4:5","5:4","8:1","9:16","16:9","21:9"]
resolution = "1K" # @param ["1K", "2K", "4K"]

interaction = client.interactions.create(
    model=MODEL_ID,
    input=[
        prompt,
        PIL.Image.open('sweets.png'),
        PIL.Image.open('car.png'),
        PIL.Image.open('rabbit.png'),
        PIL.Image.open('spartan.png'),
        PIL.Image.open('cactus.png'),
        PIL.Image.open('cards.png'),
    ],
    config=types.GenerateContentConfig(
        response_modalities=['Text', 'Image'],
        image_config=types.ImageConfig(
            aspect_ratio=aspect_ratio,
            image_size=resolution
        ),
    )
)

display_response(interaction)
<IPython.core.display.Markdown object><PIL.PngImagePlugin.PngImageFile image mode=RGB size=1152x896>Generación de video a imagen (Nano-Banana 2)
Nota: Esta función solo está disponible para el modelo Gemini 3.1 Flash Image (
gemini-3.1-flash-image).
La generación de video a imagen te permite generar nuevas imágenes utilizando el contexto de un video como referencia multimodal. Esto es útil para crear miniaturas de video de alta calidad, pósteres cinematográficos, infografías de resumen o nuevas obras de arte inspiradas en una escena de video.
Durante la generación, el modelo analiza los fotogramas del video en contexto (hasta el límite de tokens de entrada del modelo de 131,072 tokens) para extraer temas visuales y eventos clave, luego los utiliza junto con tu prompt de texto para sintetizar la imagen de salida.
Puedes pasar URL de YouTube públicas directamente en tu solicitud de API o subir archivos de video locales usando la API de Archivos.
Si el video es demasiado largo, puedes reducir los fps usando video_metadata=types.VideoMetadata(fps=0.5) para reducir el consumo de tokens.
Aquí usaremos un video público de YouTube para generar una infografía.
# Pass a public YouTube video URL as part of the contents
response = client.models.generate_content(
    model="gemini-3.1-flash-image",
    contents=[
        types.Part(
          file_data=types.FileData(file_uri="https://www.youtube.com/watch?v=UTdfxFyOQTI"),
          video_metadata=types.VideoMetadata(fps=0.5)
        ),
        "Can you create an infographic that explains what this video is about?"
    ]
)

display_response(response)
<PIL.JpegImagePlugin.JpegImageFile image mode=RGB size=1408x768>Otros prompts geniales para probar
De vuelta a los 80
text_prompt = "Create a photograph of the person in this image as if they were living in the 1980s. The photograph should capture the distinct fashion, hairstyles, and overall atmosphere of that time period." # @param {type:"string"}

interaction = client.interactions.create(
    model=MODEL_ID,
    input=[
        text_prompt,
        PIL.Image.open('cat.png')
    ]
)

display_response(interaction)
save_image(interaction, 'cat_80s.png')
<IPython.core.display.Markdown object><PIL.PngImagePlugin.PngImageFile image mode=RGB size=1024x1024>Mini-figurina
text_prompt = "create a 1/7 scale commercialized figurine of the characters in the picture, in a realistic style, in a real environment. The figurine is placed on a computer desk. The figurine has a round transparent acrylic base, with no text on the base. The content on the computer screen is a 3D modeling process of this figurine. Next to the computer screen is a toy packaging box, designed in a style reminiscent of high-quality collectible figures, printed with original artwork. The packaging features two-dimensional flat illustrations." # @param {type:"string"}

interaction = client.interactions.create(
    model=MODEL_ID,
    input=[
        text_prompt,
        PIL.Image.open('cat_80s.png')
    ]
)

display_response(interaction)
<IPython.core.display.Markdown object><PIL.PngImagePlugin.PngImageFile image mode=RGB size=1024x1024>Pegatinas
text_prompt = "Create a single sticker in the distinct Pop Art style. The image should feature bold, thick black outlines around all figures, objects, and text. Utilize a limited, flat color palette consisting of vibrant primary and secondary colors, applied in unshaded blocks, but maintain the person skin tone. Incorporate visible Ben-Day dots or halftone patterns to create shading, texture, and depth. The subject should display a dramatic expression. Include stylized text within speech bubbles or dynamic graphic shapes to represent sound effects (onomatopoeia). The overall aesthetic should be clean, graphic, and evoke a mass-produced, commercial art sensibility with a polished finish. The user's face from the uploaded photo must be the main character, ideally with an interesting outline shape that is not square or circular but closer to a dye-cut pattern" # @param {type:"string"}

interaction = client.interactions.create(
    model=MODEL_ID,
    input=[
        text_prompt,
        PIL.Image.open('cat_80s.png')
    ]
)

display_response(interaction)
<IPython.core.display.Markdown object><PIL.PngImagePlugin.PngImageFile image mode=RGB size=1024x1024>Fusión de múltiples imágenes
Consejo: Combina varias imágenes en un solo "collage" primero si necesitas superar el límite de carga de imágenes.
text_prompt = "Combine everything in these images to create a 60s inspired fashion editorial photoshoot" # @param {type:"string"}

!wget "https://storage.googleapis.com/generativeai-downloads/images/Multiple_images.png" -O "Multiple_images.png" -q
display(Image('Multiple_images.png'))

interaction = client.interactions.create(
    model=MODEL_ID,
    input=[
        text_prompt,
        PIL.Image.open('cat.png'),
        PIL.Image.open('Multiple_images.png')
    ]
)

display_response(interaction)
<IPython.core.display.Image object><IPython.core.display.Markdown object><PIL.PngImagePlugin.PngImageFile image mode=RGB size=1472x704>Colorear imágenes en blanco y negro
text_prompt = "Restore and colorize this image from 1932." # @param {type:"string"}

# Thanks to the wikimedia foundation for hosting this historical picture
!wget "https://upload.wikimedia.org/wikipedia/commons/thumb/9/9c/Lunch_atop_a_Skyscraper_-_Charles_Clyde_Ebbets.jpg/1374px-Lunch_atop_a_Skyscraper_-_Charles_Clyde_Ebbets.jpg" -O "Lunch_atop_a_Skyscraper.jpg" -q
display(Image('Lunch_atop_a_Skyscraper.jpg'))

interaction = client.interactions.create(
    model=MODEL_ID,
    input=[
        text_prompt,
        PIL.Image.open('Lunch_atop_a_Skyscraper.jpg')
    ]
)

display_response(interaction)
<IPython.core.display.Image object><IPython.core.display.Markdown object><PIL.PngImagePlugin.PngImageFile image mode=RGB size=1152x896>Transformación de Google Maps
text_prompt = "Show me what we see from the red arrow" # @param {type:"string"}

!wget "https://storage.googleapis.com/generativeai-downloads/images/Mont_St_Michel.png" -O "Mont_St_Michel.png" -q
display(Image('Mont_St_Michel.png'))

interaction = client.interactions.create(
    model=MODEL_ID,
    input=[
        text_prompt,
        PIL.Image.open('Mont_St_Michel.png')
    ]
)

display_response(interaction)
<IPython.core.display.Image object><PIL.PngImagePlugin.PngImageFile image mode=RGB size=1344x768>Monumento isométrico
text_prompt = "Take this location and make the landmark an isometric image (building only), in the style of the game Theme Park." # @param {type:"string"}

interaction = client.interactions.create(
    model=MODEL_ID,
    input=[
        text_prompt,
        PIL.Image.open('Mont_St_Michel.png')
    ]
)

display_response(interaction)
<IPython.core.display.Markdown object><PIL.PngImagePlugin.PngImageFile image mode=RGB size=1344x768>¿Qué sabe Google de mí? (Nano-Banana Pro y Nano-Banana 2)
text_prompt = "Search the web then generate an image of isometric perspective, detailed pixel art that shows the career of Guillaume Vernade" # @param {type:"string"}

interaction = client.interactions.create(
    model=GEMINI3_MODEL_ID,
    input=[
        text_prompt,
    ],
    config=types.GenerateContentConfig(
        image_config=types.ImageConfig(
            aspect_ratio="16:9",
        ),
        tools=[{"google_search": {}}]
    )
)

display_response(interaction)
<PIL.JpegImagePlugin.JpegImageFile image mode=RGB size=1376x768>from IPython.display import display, HTML
# Display grounding sources if available
for step in interaction.steps:
if step.type == "model_output":
if hasattr(step, 'grounding_metadata') and step.grounding_metadata:
if hasattr(step.grounding_metadata, 'search_entry_point'):
display(HTML(step.grounding_metadata.search_entry_point.rendered_content))<IPython.core.display.HTML object>Imágenes con mucho texto (Nano-Banana Pro y Nano-Banana 2)
text_prompt = "Show me an infographic about how sonnets work, using a sonnet about bananas written in it, along with a lengthy literary analysis of the poem. good vintage aesthetics" # @param {type:"string"}

interaction = client.interactions.create(
    model=GEMINI3_MODEL_ID,
    input=[
        text_prompt,
    ],
    config=types.GenerateContentConfig(
        image_config=types.ImageConfig(
            aspect_ratio="16:9",
        ),
    )
)

display_response(interaction)
<PIL.JpegImagePlugin.JpegImageFile image mode=RGB size=1376x768>Programa de teatro (Nano-Banana Pro y Nano-Banana 2)
text_prompt = "A photo of a program for the Broadway show about TCG players on a nice theater seat, it's professional and well made, glossy, we can see the cover and a page showing a photo of the stage." # @param {type:"string"}

interaction = client.interactions.create(
    model=GEMINI3_MODEL_ID,
    input=[
        text_prompt,
    ],
    config=types.GenerateContentConfig(
        image_config=types.ImageConfig(
            aspect_ratio="16:9",
        ),
    )
)

display_response(interaction)
<PIL.JpegImagePlugin.JpegImageFile image mode=RGB size=1376x768>Reestilización de meme famoso (Nano-Banana Pro o Nano-Banana 2 y chat)
text_prompt = "There's a vary famous meme about a dog in a house in fire saying \"this is fine\", can you do a papier maché version of it?" # @param {type:"string"}

chat = client.chats.create(
    model=GEMINI3_MODEL_ID,
    config=types.GenerateContentConfig(
        image_config=types.ImageConfig(
            aspect_ratio="16:9",
        ),
        tools=[{"google_search": {}}]
    )
)

response = chat.send_message(text_prompt)
display_response(response)

other_style = "Now do a new version with generic building blocks" # @param {type:"string"}

response = chat.send_message(other_style)
display_response(response)

other_style = "What about a crochet version?" # @param {type:"string"}

response = chat.send_message(other_style)
display_response(response)
<PIL.JpegImagePlugin.JpegImageFile image mode=RGB size=1376x768><PIL.JpegImagePlugin.JpegImageFile image mode=RGB size=1376x768><PIL.JpegImagePlugin.JpegImageFile image mode=RGB size=1376x768>Sprites (Nano-Banana Pro y Nano-Banana 2)
import PIL

text_prompt = "Sprite sheet of a jumping illustration, 3x3 grid, white background, sequence, frame by frame animation, square aspect ratio. Follow the structure of the attached reference image exactly." # @param ["Sprite sheet of a jumping illustration, 3x3 grid, white background, sequence, frame by frame animation, square aspect ratio. Follow the structure of the attached reference image exactly.","Sprite sheet of a woman dancing on a drone, 3x3 grid, sequence, frame by frame animation, square aspect ratio. Follow the structure of the attached reference image exactly.","Sprite sheet of oh no, 3x3 grid, white background, sequence, frame by frame animation, square aspect ratio. Follow the structure of the attached reference image exactly."] {"allow-input":true}

!wget "https://storage.googleapis.com/generativeai-downloads/images/grid_3x3_1024.png" -O "grid_3x3_1024.png" -q

interaction = client.interactions.create(
    model=GEMINI3_MODEL_ID,
    input=[
        text_prompt,
        PIL.Image.open("grid_3x3_1024.png")
    ],
    config=types.GenerateContentConfig(
        image_config=types.ImageConfig(
            aspect_ratio="1:1",
        ),
    )
)

display_response(interaction)
save_image(interaction, 'sprites.png')
Esto te dará una cuadrícula como esta:
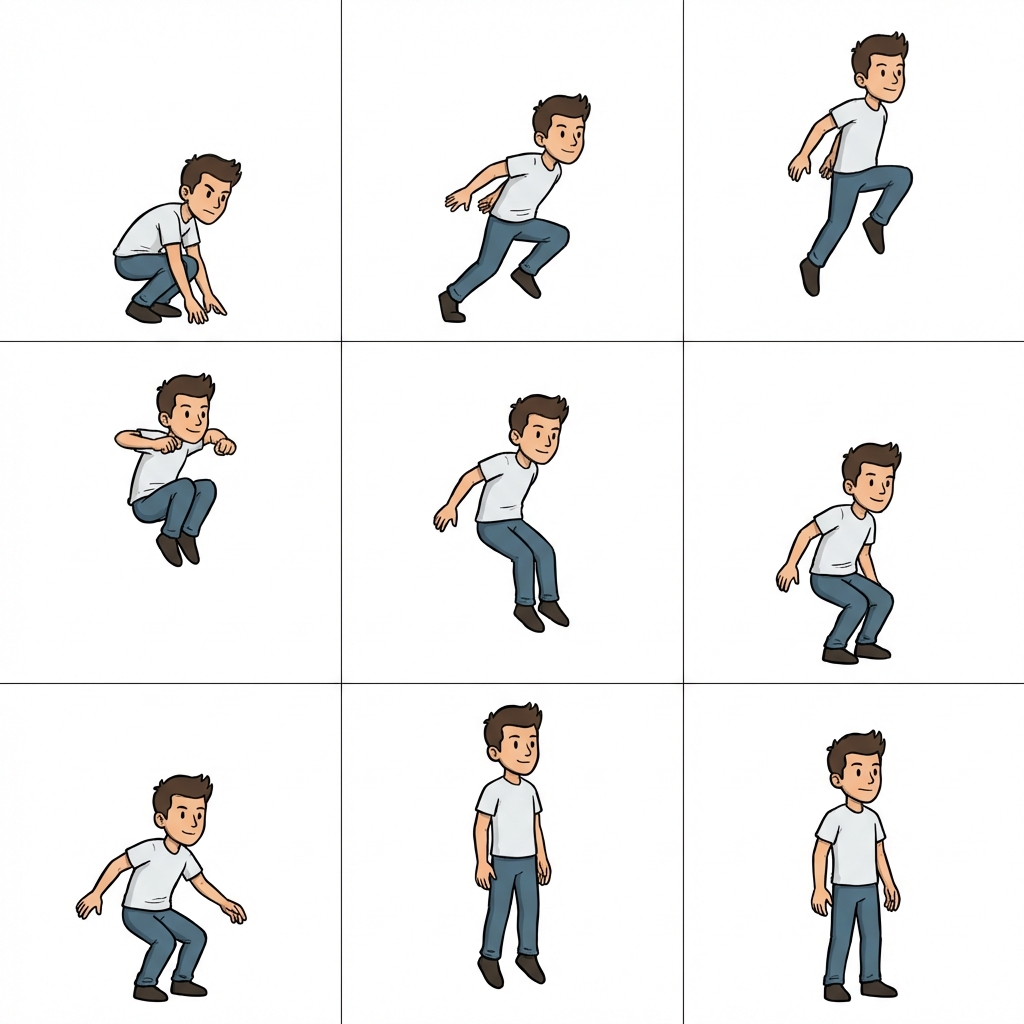
Ahora, vamos a convertirla en un GIF.
# @title
import PIL
from IPython.display import display, Image

image = PIL.Image.open('sprites.png')

total_width, total_height = image.size

effective_width = total_width - 2
effective_height = total_height - 2

frame_width = effective_width // 3
frame_height = effective_height // 3

frames = []

for row in range(3):
    for col in range(3):
        left = col * (frame_width + 1)
        upper = row * (frame_height + 1)
        right = left + frame_width
        lower = upper + frame_height

        cropped_frame = image.crop((left, upper, right, lower))

        frames.append(cropped_frame)

frames[0].save(
    'sprite.gif',
    save_all=True,
    append_images=frames[1:],
    duration=200,
    loop=0
)

# Display the GIF by reading its bytes, as suggested
display(Image(data=open('sprite.gif','rb').read()))
Esto debería darte un GIF como este:

(idealmente, deberías quitar la línea negra o indicarlo mejor en el prompt para no tener una cuadrícula como en el siguiente ejemplo)
Otro buen caso de uso de una cuadrícula con Nano-Banana Pro y 2 se puede encontrar en esta aplicación de AI Studio.
Próximos pasos
Referencias de documentación útiles:
Consulta la documentación para obtener más detalles sobre las capacidades de generación de imágenes del modelo. Para mejorar tus habilidades de prompting, consulta la guía de prompts para obtener excelentes consejos sobre cómo crear tus prompts.
Consulta un ejemplo más complejo
Ilustrar un libro : Usa Gemini para crear ilustraciones para un libro y audiolibro de código abierto
Juega con las aplicaciones de AI Studio
AI Studio cuenta con muchísimas aplicaciones de Nano-banana que puedes probar y personalizar según tus necesidades. Aquí están mis favoritas:
- Past Forward te permite viajar en el tiempo
- Personalized comics te permite crear cómics donde TÚ eres el héroe (o el enemigo, o ambos 🤯)
- Pixshop, un editor de imágenes impulsado por IA
- FitCheck, te permite probarte virtualmente cualquier ropa
- Info Genius, para crear infografías de cualquier cosa
- Y muchas otras
Consulta también Imagen:
El modelo Imagen es otra forma de generar imágenes. Consulta el notebook Primeros pasos con Imagen para empezar a jugar con él también.
Continúa tu descubrimiento de la API de Gemini
Gemini no solo es bueno para generar imágenes, sino también para entenderlas. Consulta la guía Comprensión espacial para una introducción a esas capacidades, y la de Comprensión de video para ejemplos de video.