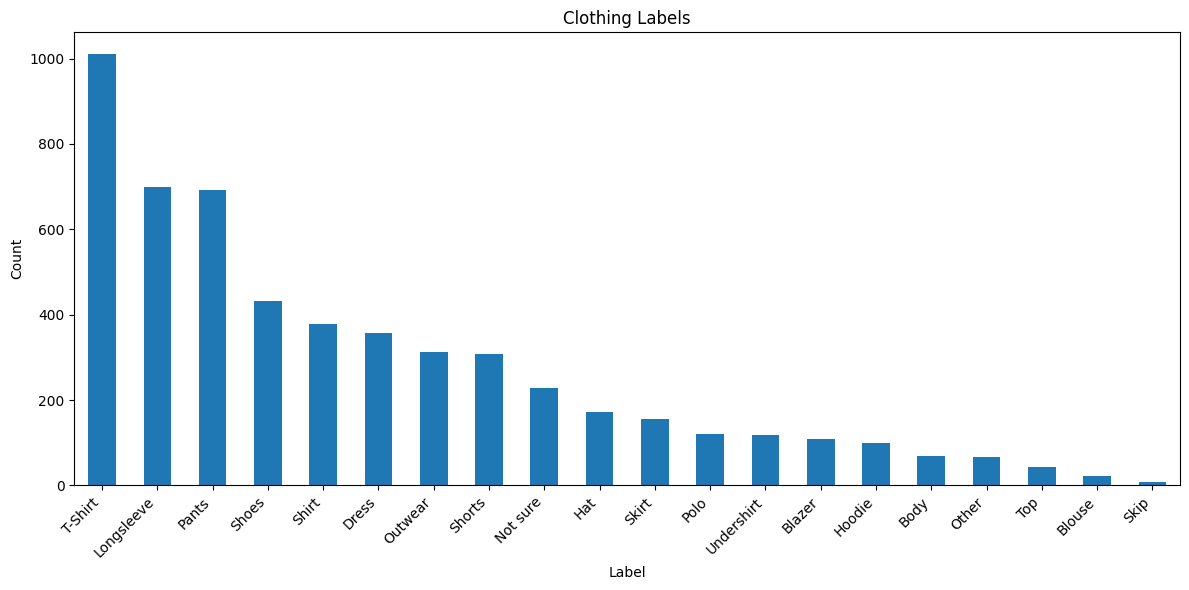
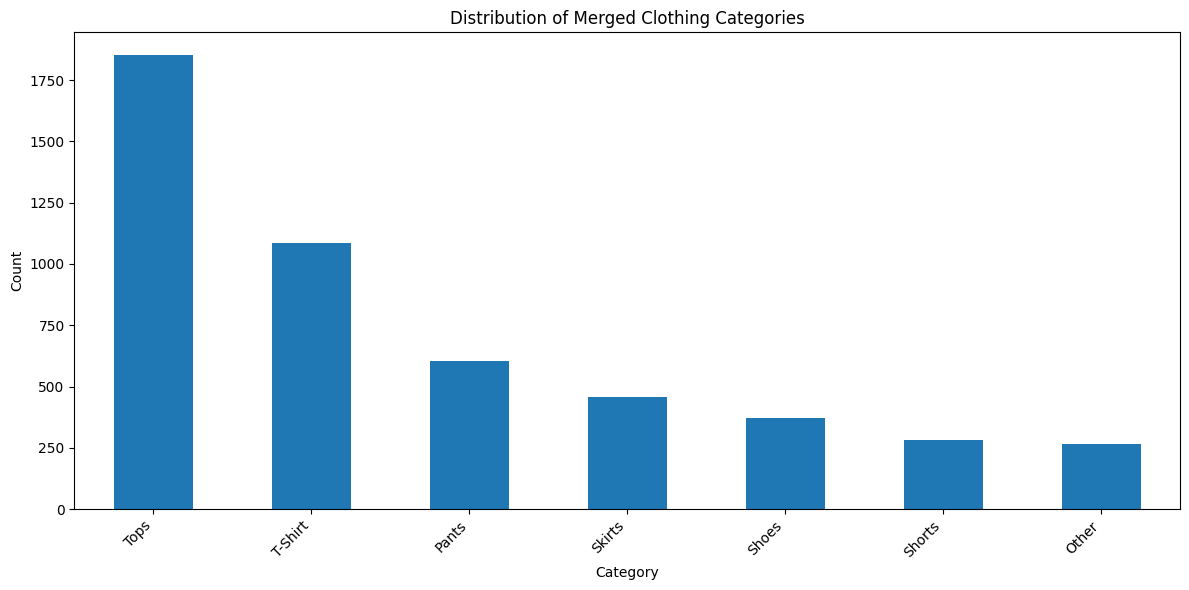
Para que la experiencia sea consistente, usaremos este enlace para acceder a nuestro conjunto de datos. Para dar crédito, gracias al autor aquí por hacerlo disponible.
Como agradecimiento al autor original, por favor, vota positivamente la versión del conjunto de datos en Kaggle si disfrutas este curso.
Limpieza de datos
Eliminando imágenes corruptas
Comenzaremos limpiando el conjunto de datos y buscando imágenes corruptas.
Variables y rutas
Primero, descarguemos el conjunto de datos y configuremos nuestras variables para que apunten a él.
Recuerda, esto es algo que cambiarás, ¡no te apresures con los dedos en shift+enter todavía! Por favor, también configura tu hf-token en la línea de abajo
PIL: Para manejar imágenes que se pasarán a nuestro modelo Llama
Huggingface Transformers: Para ejecutar el modelo
Concurrent Library: Para limpiar más rápido
import os
import pandas as pd
import numpy as np
import seaborn as sns
import matplotlib.pyplot as plt

from PIL import Image as PIL_Image
from PIL import Image

from tqdm import tqdm
from concurrent.futures import ProcessPoolExecutor
import multiprocessing


import torch
from transformers import MllamaForConditionalGeneration, MllamaProcessor
Limpiar imágenes corruptas
Esto podría tomar unos momentos ya que tenemos 5000 imágenes en nuestro conjunto de datos.
def is_image_corrupt(image_path):
    try:
        with Image.open(image_path) as img:
            img.verify()
        return False
    except (IOError, SyntaxError, Image.UnidentifiedImageError):
        return True

def find_corrupt_images(folder_path):
    image_files = [os.path.join(folder_path, f) for f in os.listdir(folder_path)
                   if f.lower().endswith(('.png', '.jpg', '.jpeg'))]

    num_cores = multiprocessing.cpu_count()
    with ProcessPoolExecutor(max_workers=num_cores) as executor:
        results = executor.map(is_image_corrupt, image_files)

    corrupt_images = [img for img, is_corrupt in zip(image_files, results) if is_corrupt]
    return corrupt_images


folder_path = IMAGES  # Replace with your folder path
corrupt_images = find_corrupt_images(folder_path)

print("Corrupt images:")
for img in corrupt_images:
    print(img)
print(f"Total corrupt images found: {len(corrupt_images)}")
corrupt_filenames = [os.path.splitext(os.path.basename(path))[0] for path in corrupt_images]
# Print out the corrupt filenames for verification
print("Corrupt filenames:")
print(corrupt_filenames)
Ahora podemos "limpiar" el dataframe restando las imágenes corruptas.
df_clean = df[~df['image'].isin(corrupt_filenames)]
# Print the number of rows removed
print(f"Number of rows removed: {len(df) - len(df_clean)}")
# Display the first few rows of the cleaned DataFrame
print(df_clean.head())
Number of rows removed: 5
image  sender_id     label   kids
0  4285fab0-751a-4b74-8e9b-43af05deee22        124  Not sure  False
1  ea7b6656-3f84-4eb3-9099-23e623fc1018        148   T-Shirt  False
2  00627a3f-0477-401c-95eb-92642cbe078d         94  Not sure  False
3  ea2ffd4d-9b25-4ca8-9dc2-bd27f1cc59fa         43   T-Shirt  False
4  3b86d877-2b9e-4c8b-a6a2-1d87513309d0        189     Shoes  False
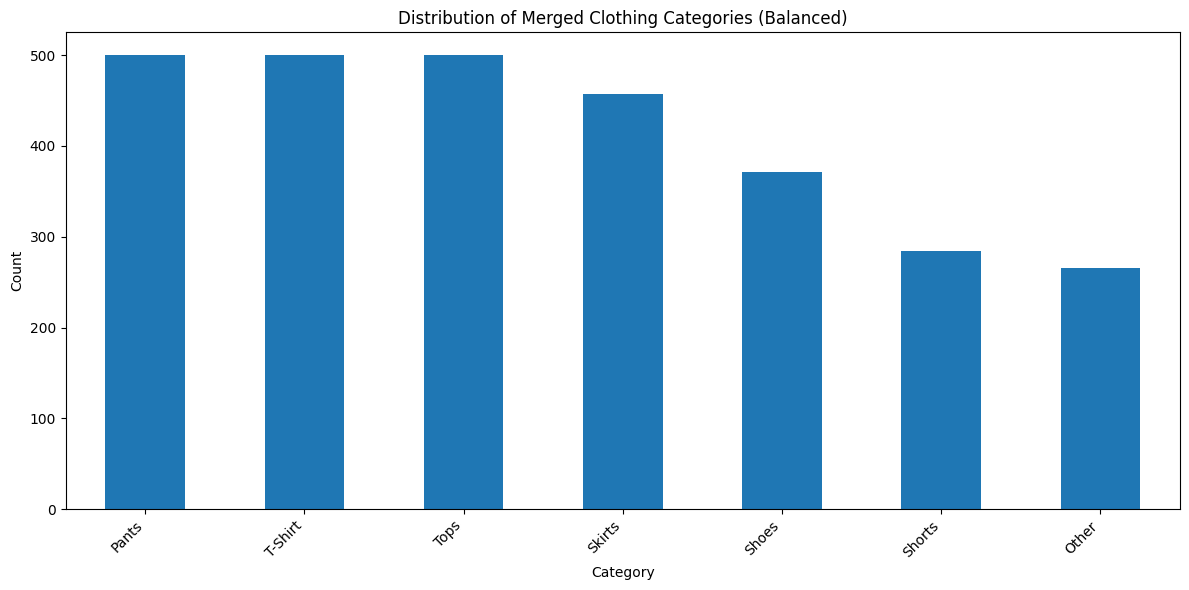
Esta es la parte que hace feliz a Thanos, equilibraremos nuestro universo de ropa muestreando aleatoriamente.
def balance_category(group):
    if len(group) > 500:
        return group.sample(n=500, random_state=42)
    return group


df_balanced = df_cleaned.groupby('merged_category').apply(balance_category).reset_index(drop=True)

# Print the count of each category in the balanced dataset
print("\nCategory counts in the balanced dataset:")
print(df_balanced['merged_category'].value_counts())
Category counts in the balanced dataset:
merged_category
Pants      500
T-Shirt    500
Tops       500
Skirts     457
Shoes      371
Shorts     284
Other      266
Name: count, dtype: int64
/tmp/ipykernel_2065289/1389168415.py:7: DeprecationWarning: DataFrameGroupBy.apply operated on the grouping columns. This behavior is deprecated, and in a future version of pandas the grouping columns will be excluded from the operation. Either pass `include_groups=False` to exclude the groupings or explicitly select the grouping columns after groupby to silence this warning.
  df_balanced = df_cleaned.groupby('merged_category').apply(balance_category).reset_index(drop=True)
# Plot the distribution of the balanced dataset
plt.figure(figsize=(12, 6))
df_balanced['merged_category'].value_counts().plot(kind='bar')
plt.title('Distribution of Merged Clothing Categories (Balanced)')
plt.xlabel('Category')
plt.ylabel('Count')
plt.xticks(rotation=45, ha='right')
plt.tight_layout()
plt.show()

print(f"Balanced dataset shape: {df_balanced.shape}")
print(df_balanced['merged_category'].value_counts())
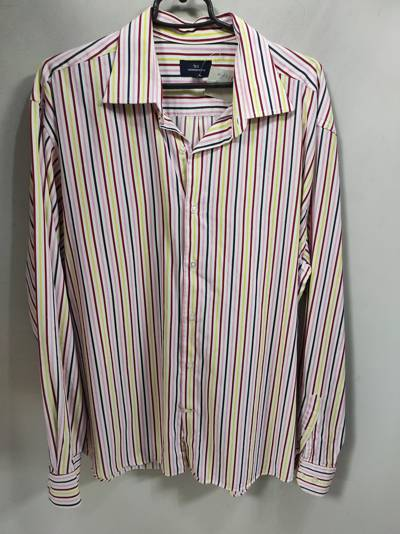
Siéntete libre de tomar cualquier ejemplo aleatorio del comando ls de arriba. Esta camisa es lo suficientemente colorida para que la usemos, así que usaremos el ejemplo actual
def get_image(image_path):
with open(image_path, "rb") as f:
return PIL_Image.open(f).convert("RGB")
image = get_image(image_path)
image
<PIL.Image.Image image mode=RGB size=400x534>
Prompt de etiquetado
Hicimos algunas ejecuciones de muestra para llegar al prompt a continuación:
Ejecutar un prompt simple en una imagen
Ver la salida e iterar
Después de intentar esto dolorosamente varias veces, aprendemos que por alguna razón el modelo no sigue el formato JSON a menos que se le inste fuertemente. Así que solucionamos esto con el prompt dramático:
USER_TEXT_OPTION = """
You are an expert fashion captioner, we are writing descriptions of clothes, look at the image closely and write a caption for it.
Write the following Title, Size, Category, Gender, Type, Description in JSON FORMAT, PLEASE DO NOT FORGET JSON,
ALSO START WITH THE JSON AND NOT ANY THING ELSE, FIRST CHAR IN YOUR RESPONSE IS ITS OPENING BRACE
FOLLOW THESE STEPS CLOSELY WHEN WRITING THE CAPTION:
1. Only start your response with a dictionary like the example below, nothing else, I NEED TO PARSE IT LATER, SO DONT ADD ANYTHING ELSE-IT WILL BREAK MY CODE
Remember-DO NOT SAY ANYTHING ELSE ABOUT WHAT IS GOING ON, just the opening brace is the first thing in your response nothing else ok?
2. REMEMBER TO CLOSE THE DICTIONARY WITH '}'BRACE, IT GOES AFTER THE END OF DESCRIPTION-YOU ALWAYS FORGET IT, THIS WILL CAUSE A LOT OF ISSUES
3. If you cant tell the size from image, guess it! its okay but dont literally write that you guessed it
4. Do not make the caption very literal, all of these are product photos, DO NOT CAPTION HOW OR WHERE THEY ARE PLACED, FOCUS ON WRITING ABOUT THE PIECE OF CLOTHING
5. BE CREATIVE WITH THE DESCRIPTION BUT FOLLOW EVERYTHING CLOSELY FOR STRUCTURE
6. Return your answer in dictionary format, see the example below
{"Title": "Title of item of clothing", "Size": {'S', 'M', 'L', 'XL'}, #select one randomly if you cant tell from the image. DO NOT TELL ME YOU ESTIMATE OR GUESSED IT ONLY THE LETTER IS ENOUGH", Category": {T-Shirt, Shoes, Tops, Pants, Jeans, Shorts, Skirts, Shoes, Footwear}, "Gender": {M, F, U}, "Type": {Casual, Formal, Work Casual, Lounge}, "Description": "Write it here"}
Example: ALWAYS RETURN ANSWERS IN THE DICTIONARY FORMAT BELOW OK?
{"Title": "Casual White pant with logo on it", "size": "L", "Category": "Jeans", "Gender": "U", "Type": "Work Casual", "Description": "Write it here, this is where your stuff goes"}
"""
'end_header_id|>\n\n{"Title": "Striped Collared Shirt", "Size": "L", "Category": "Tops", "Gender": "F", "Type": "Casual", "Description": "This shirt features a classic design with thin vertical stripes in multiple colors, including red, blue, yellow, and green, giving it a fun and playful look. The collar and cuffs are both long, with the collar being open and unbuttoned, and the cuffs rolled up slightly. The buttons are small and round. The fabric appears to be lightweight, and the shirt appears to be slightly wrinkled, adding to its casual charm. The solid grey background of the image suggests a plain backdrop, and the dark shadows of the shirt hanging on a hanger indicate that it is a product photo. Overall, this shirt is perfect for a casual, everyday look, and its fun and playful pattern makes it a great addition to any wardrobe."}<|eot_id|>'
print(processor.decode(output[0])[len(prompt):])
end_header_id|>
{"Title": "Striped Collared Shirt", "Size": "L", "Category": "Tops", "Gender": "F", "Type": "Casual", "Description": "This shirt features a classic design with thin vertical stripes in multiple colors, including red, blue, yellow, and green, giving it a fun and playful look. The collar and cuffs are both long, with the collar being open and unbuttoned, and the cuffs rolled up slightly. The buttons are small and round. The fabric appears to be lightweight, and the shirt appears to be slightly wrinkled, adding to its casual charm. The solid grey background of the image suggests a plain backdrop, and the dark shadows of the shirt hanging on a hanger indicate that it is a product photo. Overall, this shirt is perfect for a casual, everyday look, and its fun and playful pattern makes it a great addition to any wardrobe."}<|eot_id|>
Probando el script de etiquetado
Los resultados del etiquetado anterior parecen prometedores, ahora podemos comenzar a construir un esqueleto de script en el notebook para probar nuestra lógica de etiquetas.
Probemos nuestro enfoque para las primeras 50 imágenes, después de lo cual podemos dejar que esto se ejecute en múltiples GPU en un script. Recuerda, los modelos Llama-3.2 solo pueden ver una imagen a la vez.
hf_token = ""
model_name = "meta-llama/Llama-3.2-11b-Vision-Instruct"
model = MllamaForConditionalGeneration.from_pretrained(model_name, device_map="auto", torch_dtype=torch.bfloat16, token=hf_token)
processor = MllamaProcessor.from_pretrained(model_name, token=hf_token)
# Define the input folder path
input_folder_path = IMAGES
# Define the output CSV file path
output_csv_file_path = "./captions_testing.csv"
# Create an empty list to store the results
results = []
# Loop through the first 50 files in the input folder
for filename in tqdm(os.listdir(input_folder_path)[:50], desc="Processing files"):
# Check if the file is an image
if filename.endswith(".jpg") or filename.endswith(".jpeg") or filename.endswith(".png"):
# Get the image path
image_path = os.path.join(input_folder_path, filename)
# Load the image
image = get_image(image_path)
# Create a conversation
conversation = [
{"role": "user", "content": [{"type": "image"}, {"type": "text", "text": USER_TEXT}]}
]
# Apply chat template and tokenize
prompt = processor.apply_chat_template(conversation, add_special_tokens=False, add_generation_prompt=True, tokenize=False)
inputs = processor(image, prompt, return_tensors="pt").to(model.device)
# Generate the output
output = model.generate(**inputs, temperature=1, top_p=0.9, max_new_tokens=512)
# Decode the output
decoded_output = processor.decode(output[0])[len(prompt):]
# Append the result to the list
results.append((filename, decoded_output))
The model weights are not tied. Please use the `tie_weights` method before using the `infer_auto_device` function.
import csv
# Write the results to a CSV file
with open(output_csv_file_path, "w", newline="") as csvfile:
    writer = csv.writer(csvfile)
    writer.writerow(["filename", "description"])
    for result in results:
        writer.writerow(result)
Siempre es una buena idea validar las salidas de los LLM, podemos verificar nuestras etiquetas aquí:
Lección del curso «Llama Cookbook (use cases)» de Meta, publicado con licencia MIT. Traducción y adaptación al español de IA con Clase. IA con Clase no está afiliado a Meta. Ver el original · Licencia
Esta lección es gratuita. El resto del curso se abre con la Membresía de IA con Clase, que incluye todos los cursos del catálogo. Ver precios